31 October 2013

halloween looks - wednesday addams

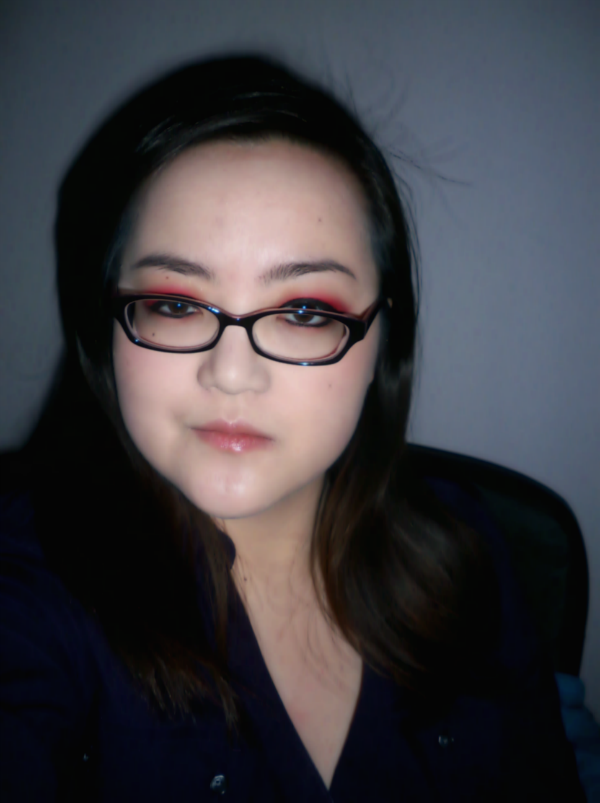
As Halloween comes to a close, I thought I'd share my Halloween costume! It was quick and easy and I ended up not even leaving the house after I put it on, but it was worth the fuss. I'm not actually a huge fan of most Halloween decorations because I'm really easily startled and I get nightmares from more or less everything, but this year I suddenly became fascinated with special effects makeup so I might end up taking makeup classes to work toward getting a professional license.


The best part of this costume? No need to cover any undereye circles. I seriously never realised how frustrating they were until this year. One benefit of wearing glasses for almost my entire life, I suppose! The clothing was just picked out of my closet: an old dress shirt from what must have been middle school, a black long-sleeved shirt, a skirt from Forever 21 that I bought ages ago, and some black tights.


BROWS
Sephora Brow Sculpting Pencil in Dark
Anastasia Beverly Hills Tinted Brow Gel in Granite

EYES
Lid - Urban Decay 24/7 Glide-On Eye Pencil in Perversion (matte blackest black) + Urban Decay eyeshadow in Faint (warm, dusty brown matte)
Lash lines - Urban Decay 24/7 Glide-On Eye Pencil in Perversion (matte blackest black)
Under eyes - Too Faced eyeshadow in Like a Virgin (taupe-grey matte) + Sigma Crème de Couture blush in Blackberry Essence (amethyst berry mist) and Strawberry Ambrosia (cotton candy)
Lashes - Maybelline Volum' Express the Mega Plush mascara in Blackest Black

FACE
Urban Decay Naked Skin liquid foundation in 1.0
Benefit boi-ing concealer in 01 light
Benefit Fake Up concealer in 01 Light

LIPS
Maybelline Color Sensational lipstick in Deepest Cherry (deepened dark plum berry)


And with Halloween coming to a close, it's time for me to work on my NaNoWriMo novel! Of course, as usual, I have no idea what I'm doing and there's only a half hour left before November, so like last year I'll be winging it. This might mean less frequent posts to this blog, but let's face it... I'm a chronic procrastinator so I'll want to do this and not write at some point.

29 October 2013

halloween looks - inspiration from alice in wonderland

Halloween is so close! I don't have much of an occasion for an excuse to dress up, but I've decided that I'm going to be an older Wednesday Addams because that doesn't require me to buy a costume (so many old shirts and skirts in my closet!) and I don't have to cover up my undereye circles. In fact, I just have to exaggerate them, which is even better.

My friend Krystal on Tumblr asked if I could make a tutorial for this Alice in Wonderland inspired look and as soon as I saw the pictures, I knew I had to try it.


Of course, I haven't done anything with my hair because it's stubborn and I'm lazy, but if you're looking to copy something like the inspiration photos, I'd suggest curling your hair with a tighter iron, something close to 3/4" if possible, and brushing out some of the curls but not all of them. Mess up your hair with your fingers and pin it up haphazardly, or leave it down!

By the way, glasses are a huge hindrance when doing looks like this. I wasn't quite sure what I was doing with my glasses off trying to get the circle around my eye right, but it doesn't look that bad.


This photos is hilarious mostly because I look really unamused and trust me... I was. I think I might have stabbed my waterline with the wood of my black eyeliner and it still stings, so no heavy eye makeup for this girl for at least a few days until I make sure nothing serious happened. Take heed, darling readers: keep your pencils sharp so this doesn't happen to you!

This whole look is meant to look a little deconstructed and messy, so don't panic if you think you've made a huge mess. It's supposed to be haphazard and rushed!
  1. Apply your foundation of choice all over your face. Ideally, you want something that's lighter than your skintone, but any foundation will work!
  2. Conceal anything you need to--spots, acne, redness--but you don't need to cover any undereye circles, which is always a good thing.
  3. After putting on eyeshadow primer from your lid to your browbone and down beneath your eyes (which will help your eyeshadow last longer), take a shimmery golden brown eyeshadow and start patting that on with your fingers. Start by applying it beneath your brows and then bringing it down to the crease.
  4. Next, take an eyeshadow brush loaded with the same brown eyeshadow and map out the shape around your eyes. This look is not about being exact, but this is the only part that requires caution and a steady hand. The shape for which you're aiming is an oblong circle that extends up to your brows, into the bridge of your nose, and goes down toward your cheekbones. The shape will be different for every face, so don't worry if it doesn't look like any of the inspiration pictures or the ones of me!
  5. Fill in the shape with the brown eyeshadow. You do not need to place any of this colour on your lid because we will be placing black cream over it.
  6. Using a black cream pencil or eyeliner, fill in your lid and trace a thick line beneath your eye. This can be haphazard and messy.
  7. Smudge the black as much as possible. The shape should be inexact, so don't worry too much about where the colour is going.
  8. Set the pencil with a black eyeshadow.
  9. Rim your waterline and lash lines with a black eyeliner.
  10. Using your black pencil, sketch out a curve beneath the inside corner of your brow down the sides of your nose. Blend with your finger. (Alternately, you can use a black shadow but be sure to use the colour sparingly on a brush so it doesn't spread everywhere.)
  11. Take a black eyeshadow and fill in your brows. The brow shape is meant to be slightly thin with a curved arch, not a pointed one, and the brow should extend quite far down.
  12. Using a deep bronzer or the same brown eyeshadow as before and a big brush, contour beneath your cheekbones. The easiest way to do this is suck in your cheeks as though you're making a fish face and fill in the hollows. I did this quite a bit lighter than the inspiration photos because I was using my finger since the eyeshadow pan was tiny, but you can go wild with the colour as long as you blend it out.
  13. Blend a deep brown-pink or plum blush onto the cheekbones and bring it up toward the hairline at the temples. You can also load the colour one far more intensely than I've done here because I was using a sparkly eyeshadow in a palette with my finger.
  14. Fill in your lips with a deep burgundy lipstick. The inspiration photos have a burgundy that is far more brown than the colour I used because I unfortunately don't own any lip colours that are brown-toned.
  15. Mix a light coloured lip gloss with a white eyeshadow and pat that on top of your cheekbones. This will give that radiant finish as seen in the inspiration photos.

BROWS
Sugarpill pressed eyeshadow in Bulletproof (deep matte black)

EYES
Around eye socket - Urban Decay eyeshadow in Smog (deep coppery bronze)
Under eyes - Oslo Cosmetics eyeshadow in Voltanis (tapped over Smog)
Lid - Ulta Eye Crayon in Black Tie + Sugarpill pressed eyeshadow in Bulletproof (deep matte black)
Lash lines + waterline - Urban Decay 24/7 Glide-On Eye Pencil in Perversion (matte blackest black)

FACE
Urban Decay Naked Skin liquid foundation in 1.0
Benefit Fake Up concealer in 01 Light
Benefit boi-ing concealer in 01 Light
Contour - Urban Decay eyeshadow in Smog (deep coppery bronze)
Blush - Urban Decay eyeshadow in Last Call (metallic sugar plum)
Highlight - Smashbox O-Gloss Gold + Urban Decay eyeshadow in Polyester Bride (white snow shimmer with silver micro-glitter)

LIPS
Obsessive Compulsive Cosmetics Lip Tar in Black Dahlia (blackest blackened red)
Wet N' Wild Fantasy Makers lipstick in Black

27 October 2013

halloween looks - broken doll tutorial

Wow, it's been a week since my last post. I've been lacking in inspiration and focus as of late, but I just discovered a desire to try special effects makeup and I went full out with recreating my look from last Halloween.

Ta-da! This was my last-minute costume that I wore to my a cappella group's rehearsal. I had my hair in tight ringlets and only managed to curl about 2/3s of my hair before we had to go and I was already late... And it still took me two hours to do the hair alone. I wore a dress I bought at Hot Topic, ripped nylons, and round-toed black heels. I think it worked well for something I slapped together.

There are a few changes I made this time around: I filled in my eyebrows to mimic a more rounded shape, I didn't bother curling my hair with a 1/2" iron, and I chose a lighter lip colour.

Pre-broken doll...

My hair takes too long to curl regardless of what I do to it, but I think this was worth it. If you want to try this for Halloween, you don't even need to curl your hair! You can just put your hair into pigtails of your choice, but I was going for a very made up doll look. The tutorial follows the next picture and if anyone needs a detailed description and/or photo for a particular step, please don't hesitate to ask.


  1. Prime your face. I'm using Embryolisse Lait-Creme Concentre because it's wonderful and my skin needs the extra moisture, but you can use a normal foundation primer if you'd prefer. (If you want to go all out and use circle contacts, put those in now before you start your makeup!)
  2. Using a foundation brush, cover your face with a foundation that is one shade lighter than your skin tone. You can forgo the lighter foundation if you don't have it, of course, but they don't call them porcelain dolls for nothing.
  3. Conceal as needed. I have a lot of redness in my cheeks, so I focused on that and on the dark spots around my face. Dolls have completely flawless skin, so aim for that. You can also use a full-coverage foundation so you don't need to do as much concealing!
  4. After applying eye primer, use a matte shadow that is close to the colour of your skin on each eyelid. You don't need to be precise with this--it's mostly to help the rest of the eyeshadow blend more easily. (Here's the fun part: you don't need to stick to the eyeshadow look I've done here! As long as you keep it simple, anything goes. If you want to use a light blue eyeshadow, go for it. Use a green, if you'd prefer!)
  5. Using a matte shadow that is a few shades darker than your skintone, work the colour into the crease of your eye. Make sure to blend blend blend! When you're done with this, use the same shade and contour slightly around your nose. You want to connect the inner corner of your brow to your nose and then draw a straight line down, and then shade the tip of your nose to get the dainty doll look. Make sure to blend out all the harsh lines. (I forgot to do this here, but you can also brush the shadow below your bottom lip to make your lips appear fuller. Add a little white pencil on your cupid's bow, too!)
  6. Take a matte black shadow and work that into the crease over the nude shadow. This is mainly to provide definition that will emphasise the doll lashes you'll be putting on later.
  7. Fill in your eyebrows! Mine are naturally thick so I didn't want to work against that. Dolls tend to have thin eyebrows so if you have thin brows or your brows are light, try playing around with changing the shape of your brows! Aim for a soft, rounded shape with no discernible arch.
  8. Line the waterline and just under your eye with a white pencil. You're shooting for big eyes, and this will work in your favour.
  9. Line your upper lash line with a black pencil. This will give you a place to hide the false lashes.
  10. Draw a dashed line with your black pencil below where you've used the white pencil on your lower lash line.
  11. Curl your lashes and add a coat or two of mascara. Now for the fun part: glue on those falsies! Thickness is not what you're aiming for--you want a pair of long, fluttery lashes.
  12. Using a red blush or shadow, go wild with colour on your cheeks. I used an eyeshadow with a sightly heavy hand. Focus the colour on the apples of your cheek and don't be afraid to make the colour bold.
  13. Take a taupe or brown pencil and dot some fake freckles on over the cheeks and the bridge of your nose. You don't want these to look too perfectly spaced, but aim for clean dots.
  14. Take a pink lipstick (or lip product of your choice) and fill in your lips. Don't be afraid to exaggerate the look and work out of your lip line! Dolls have naturally pouty lips so you can focus on the bottom lip and not apply anything at the corners of your mouth. If you have very pigmented lips, you might want to put a little concealer into the corners with a concealer brush.
  15. Place a bit of a light pink gloss on the center of your bottom lip.
  16. Time to make yourself as creepy as possible! Take a sharp black pencil and lightly begin to trace where you want the cracks and chips to go. Don't make these lines too harsh at first and don't think too hard about what you're doing with the lines. Make them haphazard! You can outline large pieces that will be missing.
  17. Fill in the large broken pieces. Use the pencil with a heavy hand to fill in the outlines to make them appear more multi-dimensional.
  18. If you're going out, you can possibly set your face with a translucent powder. However, the black pencil might prove difficult. Test it before you go out, and if that doesn't work, a setting spray will help tremendously.
  19. Keep reminding yourself not to touch your face. If you look at the first photo in this post, you can see that the eyeliner kept smudging because I have that bad habit of touching my face constantly. I'd also advise not to put a big missing chunk on your nose because that's likely where you're smudge things first.


BROWS
Sephora Brow Sculpting Pencil in Dark
Anastasia Beverly Hills Tinted Brow Gel in Granite

EYES
Lid - Urban Decay eyeshadow in Foxy (very light yellow/white matte)
Crease - Urban Decay eyeshadow in Naked2 (taupe matte), Faint (warm, dusty brown matte) + Crave (deepest, darkest brown/black matte)
Upper lash line - Urban Decay 24/7 Glide-On Eye Pencil in Zero (black)
Lower lash line - Urban Decay 24/7 Glide-On Eye Pencil in Yeyo (metallic white) and Zero (black)
Lashes - Maybelline Volum' Express the Mega Plush mascara in Blackest Black
False lashes - Ardell lashes in #105 Black

FACE
Marc Jacobs Gel Genius Foundation in 10 Ivory Light
On cheeks - MAKE UP FOR EVER Full Cover Concealer in Pink Porcelain 1
Benefit Fake Up concealer in 01 Light
Under eyes - Maybelline Fit Me Concealer in 15 Fair
Blush - Sugarpill pressed eyeshadow in @#$%! (vampy pearl red with silver metallic sheen)
Fake freckles - Urban Decay 24/7 Glide-On Eye Pencil in Desperation (deep taupe to gray matte)
Broken patches - wet n wild coloricon eyeliner in black

LIPS
NYX Soft matte Lip Cream in Sao Paulo (plummy-pink)
NYX Butter Gloss in Merengue (pink lilac)


My mom told me that I'm creepy. I think that means this is a success.

19 October 2013

looks of the day - two looks inspired by lisa eldridge's videos!

So, after posting the last look inspired by one of Lisa Eldridge's looks, I saw her post about how she loved all of the photos that were being tagged #mylisalook and she set up a bit of a contest. (Look, my face is on her post!) It's been a few days but I just wasn't feeling like putting on makeup, especially with the cloudy weather over the past few days. But today, she posted a new video and I really wanted to try it! There's also a red eyeshadow video here that I just had to try because I'm all about the bright colours.


This look is very subtle but gorgeous for daily wear. I've been looking for every excuse to use the rms beauty lip2cheek in diabolique because I'm absolutely obsessed with it, and luckily it can be applied very sheerly for a nice berry tint to the lips. (Also, look at how I took this photo--I'm apparently in denial about my height despite the fact that I've been 5'3" for almost 8 years of my life...)

BROWS
Benefit Instant Brow Pencil in Deep
Anastasia Beverly Hills Tinted Brow Gel in Granite

EYES
Lid - Urban Decay eyeshadow in Half Baked (golden bronze)
Inner corner - thebalm eyeshadow in Snobby (yellow with gold shimmer)
Lash lines - Urban Decay 24/7 Glide-On Eye Pencil in Zero (black)
Lashes - Maybelline Volum' Express the Mega Plush mascara in Blackest Black

FACE
Embryolisse Lait-Crème Concentrè + Dr. Jart+ V7 Beauty Balm
Under eyes- Maybelline Fit Me concealer in 15 Fair
Benefit Fake Up concealer in 01 light
COVER FX Cream Concealer in N Extra Light
Contour - Maybelline Fit Me stick foundation in 235
Highlight - Benefit high beam
bareMinerals blush in t.t.y.l. (sheer poppy pink)

LIPS
rms beauty lip2cheek in diabolique (dark burgundy)

Since this was subtle, I was able to take it off with relative ease and put on the next look. Red eyeshadow is possibly one of my favourite things in the world but wearing it on a normal basis tends to earn you strange looks. Believe me, I've worn it a few times to class and people don't know what to say most of the time.


My glasses just make my eyes look even more misshapen. I've come to realise that I actually like a strong eye with a strong lip on me. I tend to think that with a nude lip, I actually look quite washed out because I'm so pale. So here's the look with some pink-red lips!

BROWS
Anastasia Beverly Hills Tinted Brow Gel in Granite

EYES
Sugarpill pressed eyeshadow in @#$%! (vampy pearl red with silver metallic sheen)
Liner - Urban Decay 24/7 Glide-On Eye Pencil in Perversion (matte blackest black), Maybelline Line Stiletto Ultimate Precision Liquid Eyeliner in Blackest Black
Lashes - Maybelline Volum' Express the Mega Plush mascara in Blackest Black

FACE
Urban Decay Naked Skin liquid foundation in 1.0
Benefit Fake Up concealer in 01 Light
NYX powder blush in Desert Rose (matte burgundy-pink)

LIPS
fresh Sugar Lip Treatment SPF 15
Sephora Rouge Cream Lipstick in The Red 04 (classic bright red)


I was going to do a third look, probably something for Halloween, but my eyeliner and my makeup remover wipe got into a catastrophic fight and I almost lost my eyeballs because of it. The skin around my eyes? Already a casualty. There was a great burning sensation as I was trying to take off all the black liner so I decided it was best to not do anything else!

17 October 2013

review - oslo cosmetics

As previously mentioned in this post, I ordered a blogger pack from Oslo Cosmetics, a new indie makeup brand. Joyce, the owner, is lovely and very prompt about sending everything out, and she's always welcome to customer feedback. I was dying to try their shadows because there are so many gorgeous colours.

Their loose eyeshadow is different from most brands. It's stickier than traditional loose eyeshadows. For those of you with sensitive noses, there is a bit of a scent to them--I don't know why, but I think they smell a little bit like stale cardboard. But it's a minor issue that doesn't affect my opinion on them.


They may look like they don't have much product in them due to the density of the formula, but trust me, a little goes a long way!


From left to right, we have Colossus: Carinae, Dark Days: Ara, Starlight: Grus, and Starlight: Serpens. Sidenote: can camera companies consider making lefthanded cameras? Because I am suffering over here. I made swatches on my right arm and then realised that I had to hold the camera with my right arm in order to actually see what I was doing. So I apologise that these swatches are out of focus... Holding the camera in my left hand was tedious! I wish someone took a picture of me during this process because it was absolutely bizarre. The following photos of the shadows themselves are also kind of haphazard in their size. I'm trying to get used to using my dad's 35mm camera, but it's a steep learning curve!

Let's start with the shadows!

Colossus: Carinae

Oslo Cosmetics' description:
Beautiful, shimmery/metallic peach-pink, with light green/gold shift.

As much as I love colour, I'll always gravitate toward peach-pinks that have hints of gold in them. They look amazing on everyone and this is no exception. It's perfect for everyday looks or to blend out warm shades. I didn't notice much of a green shift, but the gold was enough to sell it to me.

Dark Days: Ara

Oslo Cosmetics' description:
Dark, sultry shimmery brassy red.

For some reason, my photographs just aren't capturing the gorgeous red tones in this shadow and they always look brown. It's a deep red-brown and it would look wonderful in a smokey eye. (Sidenote: don't be afraid of reds in eyeshadows!)

Starlight: Grus

Oslo Cosmetics' description:
Bright, rich sapphire blue with duochrome blue glitter.

This is SUCH a gorgeous blue. The glitter can make it a little difficult to blend, but if you apply a thin layer of loose powder over your lid before you put on eyeshadow, it'll make everything much easier. I can't get over how wonderful this is for autumn because it's metallic and so bright.

Starlight: Serpens

Oslo Cosmetics' description:
Flashy, bright indigo-blue-violet, with mystic duochrome glitter.

This shade was much more on the dark blue/indigo side for me and I wish it had been a little more violet like the photo on the website. The glitter also made this one the hardest to apply evenly and it was the only shade that disappointed me.

Overall, I really liked how these applied. I tested Grus over primer on one eye and with no primer on the other, applied with my finger. The website suggests using a sticky primer like its eye primer wand or a velvet cream base, but since I didn't order one of those, I just used a silicone-based eyeshadow primer. Without primer, it only lasted three hours before it started to crease and after six hours, it was completely gone. The website doesn't make any claims about the shadows being long-lasting, so this was more for my own sake than anything else. With primer, it lasted about seven hours before there was any noticeable creasing.

I then tested the shades all together in a sloppy look that was slapped together before having to run errands, so no photos of that, unfortunately. This time, I applied the shadows with a brush and I think it made the application a lot smoother. I would definitely recommend using a brush because that way the oils in your fingers don't mess with the formula of the shadows and make them harder to blend out. With primer, they lasted 8 hours before creasing.

The shadows come in a variety of colours and there's even a Game of Thrones collection coming in November. If you're looking for an indie brand to try, Oslo Cosmetics may be for you!