Showing posts with label thebalm. Show all posts

24 January 2014

disney villains series - scar

OKAY, so I said I wasn't going to do any makeup looks for a while, but I lied. Just this one until the scratch heals because I just noticed that it's starting to scab. (TMI, maybe?) Katina told me that I should do something with my look for my blog, so here it is! I took to Twitter last night and joked that I looked like Scar from the Lion King.


Lo and behold, a terrible photo of my eye taken in the car earlier today. (No sunlight, just super winds and cloud cover because it's fucking cold in Chicago.) Zero makeup on, whoo!

My younger sister spent at least a good year of her life watching the Lion King three times a day, every single day, and of course I was always there to watch it, too. There's something to be said about how the two of us prefer the anthropomorphic animal Disney films to the princess ones, but they always had the greatest music, okay? And Jeremy Irons is just all around insanely talented.
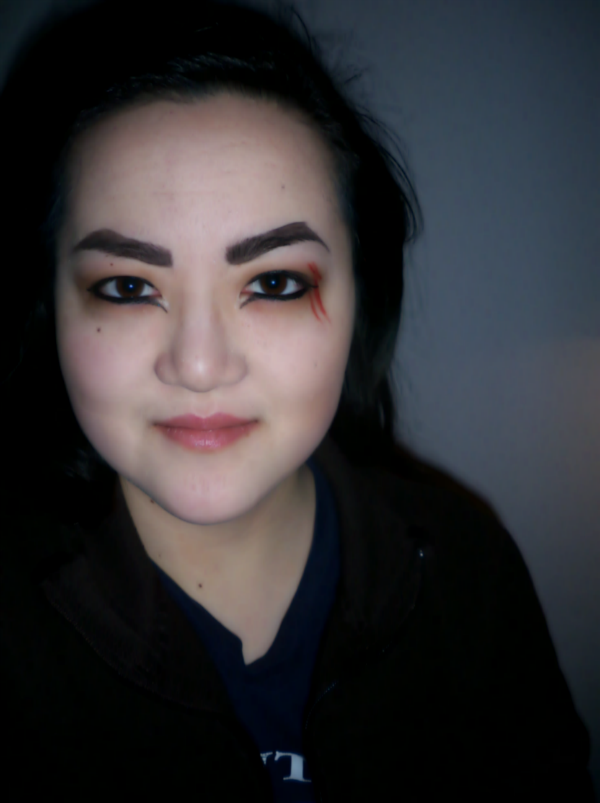

I asked for opinions on Tumblr on what I should do with my lips, and after taking multiple photos in both nude and black lipstick, I came to the conclusion that no lipstick at all seemed to work best. My natural lip colour is quite pink, but the truer nude lipsticks that I tried on just washed me out and the black lipstick looked hilarious.

Obviously, I emphasised my scratch a lot more and the red gel eyeliner that I have was perfect. I decided to go with red as though the scratch was new because trying to get a pale, slightly puckered scar-like mark would be too difficult given the tools I have. (There's multiple marks because I have spatial issues and couldn't figure out where to draw one connected line. Whoops!) The eyeshadow itself was simple--two different matte browns, the darker one over the lid and the lighter one into the crease and pulled upward toward the brow. I tightlined my upper and lower lashes with a black pencil liner and lined both my upper and lower lash lines with a liquid liner, creating wings in both corners.

My brows look HILARIOUS, but since I have naturally dark brows that are absolute torture to cover up with the gluestick trick, I had to cover all of my brow hair with a dark matte brown-black eyeshadow. Exaggerating the arch of your brow really makes the look seem more villainous.

Scar has a very thin, angular face, which is a common physical attribute of villainous characters, so I tried to make my face a little more angular, too, using contouring beneath my cheekbones, under my jawline, around my forehead and temples, and down the sides of my nose. I'm so pale that the flash tends to wash me out, though, so it's not really as noticeable as I had hoped.


Dat scar.

BROWS
Urban Decay eyeshadow in Crave (deepest, darkest brown/black matte)

EYES
theBalm Put a Lid On It! eyeshadow primer
Lid - theBalm Nude 'Tude eyeshadow in Sleek (dark black-brown matte)
Crease - Urban Decay eyeshadow in Faint (warm, dusty brown matte)
Lower lid - theBalm Nude 'Tude eyeshadow in Sultry (warm medium brown matte/satin)
Waterlines - Urban Decay 24/7 Glide-On Eye Pencil in Perversion (matte blackest black)
Upper lash line + inner corner wing - Sephora Collection Long-Lasting 12HR Wear Eye Liner in 01 Black (matte black)
Inner corner - Urban Decay 24/7 Glide-On Eye Pencil in Yeyo (metallic white)
Scar - Makeup Geek Gel Liner in Poison (matte rusty red)

FACE
Urban Decay Naked Skin liquid foundation in 1.0
Contour - Maybelline Fit Me foundation stick in 235 + Too Faced Milk Chocolate Soleil bronzer
Contour (nose) - Urban Decay eyeshadow in Faint (warm, dusty brown matte)

LIPS
fresh Sugar Lip Treatment SPF 15


Just a close-up of the eyes for you, since nothing else really matters in this look. :]

23 January 2014

look of the day - 70s inspiration/lily evans potter

Another request from my friend Meg! She made a whole bunch, so you'll be seeing her name on a lot of posts. She requested a look for Lily Potter. You know, Harry Potter's mum? She was a teenager in the 70s, so of course I had to draw some inspiration from photos from the 70s.

There was a strong push toward natural looking skin with foundation that matched your skin tone, and everyone wanted to be tan. Obviously, that's not going to happen for me, seeing as I'm naturally ghostly pale. Lips were kept in natural tones, if not frosty shades, and there was light blush on the cheeks. The focus was on the eyes--frosty shadows in shades of blue and green were popular, but so were shades of pink and brown. I used this and this as reference sites.


My hair is looking sloppy, but I had just shaken it up to try to give it some Farrah Fawcett-esque volume. Aside from super flipped-out hair, stick straight hair was also a popular look, so luck was on my side!

Unfortunately you can't really see the light blue eyeshadow that I put on since I didn't bring it up past the crease! Brows were more natural and thin, but mine are full so I just used a brow pencil and brushed that through. I used two different lip glosses to get a nude pink shade that was lighter than my natural lip colour, and I used a gel blush for my cheeks, as well as some liquid highlighter above my cheekbones.

For my eyes, I mixed a medium-dark blue with a very pale blue shade to get a colour that seemed to match more of the reference photos and packed the pigment onto my lids. Using a matte brown eyeshadow, I blended the colour into the creases of my eye sockets. Some liquid eyeliner winged out on top, a white pencil on the lower waterline, and a dark blue eyeliner along my lower lash line rounded off the look!

Obviously this look may not have suited Lily exactly, as she had ginger hair and green eyes, which obviously doesn't match my colouring in the slightest. But I think she would have stuck to natural lip colours and flawless skin with a pop of colour on the lids. Since she had green eyes, maybe she would have worn matching green shadow, or more neutrals since her colouring was so striking, but I think blue eyeshadow, when done right, looks good on everyone.

BROWS
Benefit Instant Brow Pencil in Deep
Anastasia Beverly Hills Tinted Brow Gel in Granite

EYES
theBalm Put a Lid On It! eyeshadow primer
Lid - Fyrinnae loose eyeshadow in Arcane Magic: Mermaid Masquerade (royal blue shimmer with purple/pink shift) + Fyrinnae loose eyeshadow in Otherworld (pale aqua shimmer with turquoise and blue sparkle)
Crease - theBalm Nude 'Tude eyeshadow in Sultry (warm medium brown matte/satin)
Upper lash line - Sephora Collection Long-Lasting 12HR Wear Eye Liner in 01 Black (matte black)
Lower waterline - Urban Decay 24/7 Glide-On Eye Pencil in Yeyo (metallic white)
Lower lash line - Urban Decay 24/7 Glide-On Eye Pencil in Binge (pearly navy blue, discontinued)

FACE
Urban Decay Naked Skin liquid foundation in 1.0
Benefit boi-ing concealer in 01
Under eyes - Benefit Fake Up Concealer in 01 Light
Too Faced Milk Chocolate Soleil Bronzer
Josie Maran Coconut Watercolor Cheek Gelée in Poppy Paradise
Highlight - Benefit high beam (cheekbones) + Benefit moon beam (cupid's bow + bridge of nose)

LIPS
Buxom Full-On Lip Cream in White Russian (nude pink)
Buxom Full-On Lip Polish in Dolly (shimmering muted plum)


I'm going to take a few days off from putting on makeup, at least near my eyes. Luckily, it's not hugely noticeable in these pictures, but I scratched the corner of my left eye this morning. Thankfully, I didn't break skin, but it's red and raw and stings quite a bit, so it's time for me to ease up!

22 January 2014

look of the day - 40s inspiration/minerva mcgonagall

Okay, I know the title of this post says 40s inspiration, which this look really is, but the original request came from my dear friend Meg, who said:

i politely request a young, hot mcgonagall look. for science.

SO. I had to comply because let's face it, McGonagall's history is fantastic. If any of you are on Pottermore, you've probably read what J.K. Rowling posted about her family and background. She was born in 1935, which means that she was leaving Hogwarts sometime in the 50s. I've done a few retro/50s inspired looks already, but I think McGonagall, if she even bothered with makeup, would have been a little outdated with her look, though it would still be classic. So I chose to go with the 40s, using this site as inspiration.

The 40s had a very clean look, with natural, groomed brows, a clean face, and minimal eye makeup. The focus was entirely on the lips. The 40s were all about lipstick, especially red lips. I'm of the impression that McGonagall probably didn't care too much for lipstick, but hey, a girl can dream!


I don't have a close-up for you all today, unfortunately, but that's because the eye makeup is very, very minimal. I used all matte eyeshadows--a skin-toned shade all over the lid, and a slightly deeper shade in the outer corner and crease just for a bit of definition. I tightlined my lashes with a black eyeliner and lined my upper lid with a brown pencil liner, and then I curled my lashes and put on a few coats of mascara.

Put on some foundation or anything with light to medium coverage and conceal what needs to be concealed. Use a pink-y blush on the cheeks and bring the colour up along the cheekbones. Contouring is totally optional, but I always think it adds something nice to the overall look, especially since I'm so used to having a super round face. (Which is changing seeing as I've lost over 20 pounds since August...)

THE LIPS! Okay, so all I did was put on some red lipstick and blot it a few times with a tissue to take off the shine and some of the colour. Even though the 40s were all about strong red shades, I think McGonagall wouldn't have wanted something that was too dramatic. I've also read that women were changing their lip shape with their lipstick to make their mouths appear fuller, but I always feel a little clownish doing it. But if you're comfortable with it, then go for it. Never let anyone else dictate how you do your makeup! Makeup should make you feel good about yourself, so don't listen to haters.

Also, maybe one day I'll dress up for pictures, but today is not that day. And it will likely not be that day until I can overhaul my closet for clothing that both physically fits me and matches my personal style. We'll see!

BROWS
Benefit Instant Brow Pencil in Deep
Anastasia Beverly Hills Tinted Brow Gel in Granite

EYES
theBalm Put a Lid On It! eyeshadow primer
Lid - Urban Decay eyeshadow in Foxy (very light yellow/white matte)
Outer corner + crease - Urban Decay eyeshadow in Faint (warm, dusty brown matte)
Brow bone - Saucebox Cosmetics Creme de la Creme palette (lightest off-white shimmer shade)
Upper lash line - Sephora Nano Eyeliner in 05 Chocolate
Waterline - Urban Decay 24/7 Glide-On Eye Pencil in Zero (black)
Mascara - Maybelline Volum' Express the Mega Plush mascara in Blackest Black

FACE
Urban Decay Naked Skin liquid foundation in 1.0
Benefit boi-ing concealer in 01
Under eyes - It Cosmetics Bye Bye Under Eye concealer in Light
Contour (cheeks) - NYX Powder Blush in Taupe (matte taupe)
Contour (nose) - Urban Decay eyeshadow in Naked2 (taupe matte)
bareMinerals blush in t.t.y.l. (sheer poppy pink)

LIPS
Maybelline Color Sensational lipstick in 645 Red Revival

14 January 2014

hogwarts series - slytherin (dramatic)

Today has been kind of a strange day and we'll leave it at that? I did buy a second bookshelf, though, as it was much needed for my room to be more organised.

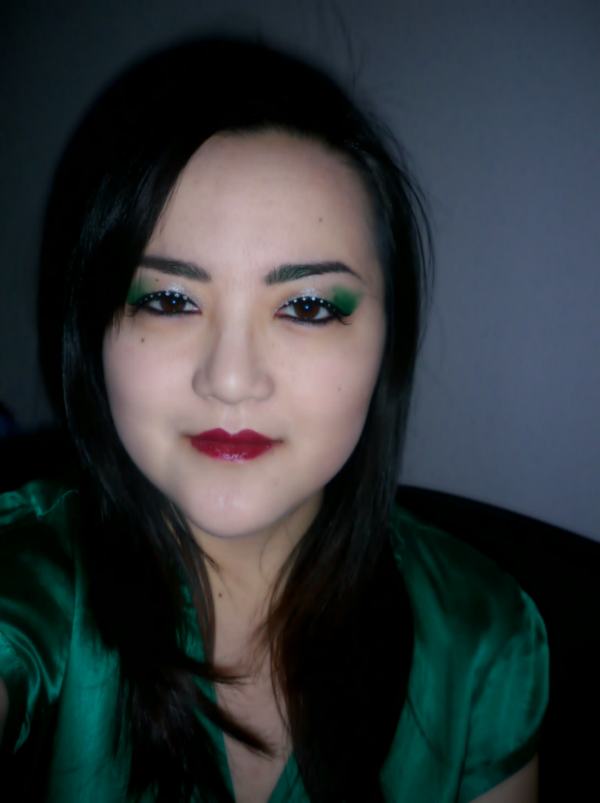
I had the idea for today's look brewing in my head since last night. Glitter and false lashes were a must, and I imagined the dramatic Slytherin look to be a bit old glamour but more colourful. Green and silver figure heavily into the eyes (and brows!) but it's grounded with black eyeliner. Contouring was a must, as well, though I didn't spend as much time on it as I thought I would. Anything too sculpted would compete too much with the eyes. (Plus, I started this look kind of late and was rushing toward the end...)


Excuse the hair, please. I wanted to straighten it until it was poker-straight, but I had to take pictures and scrub my face before heading down to dinner. I did consider doing finger waves, but I definitely didn't have the ability to focus on that today. Also, working with glitter is tough--I didn't have precision using my fingers to press on the glitter, so the green is a little sloppy. But hey, glitter is glitter and it looked pretty good regardless!

After applying eyeshadow primer, take a loose silver eyeshadow and press it on the inner 2/3s of your eyelids, and take a loose green eyeshadow to the outer 1/3. (I had to use a pressed eyeshadow beneath a loose one to get the colour and intensity I wanted.) Thoroughly blend where the colours meet!

The trick to getting the perfect, clean line/wing is to use tape. Follow the line of your lower lid for the best angle.

Over the eyeshadow, take a tacky glitter base and press it over your lid, letting it dry slightly, and then lightly press glitter to the lid. Line both your upper and lower lids--I used a liquid liner on the upper lid and a pencil on the lower lid. Create a wing, if you'd like. Curl your lashes, apply some mascara, and if you'd like to go full out, put on some falsies! I have this lovely pair that has crystals on the base and I thought they would be perfect. My brows are also filled with dark green eyeshadow, but if you aren't a crazy brow person, you should consider using an eyeshadow or brow powder that is slightly darker than your hair colour for dramatic effect.

For the face, start with a medium-coverage foundation all over and use a concealer to cover up any redness. Take a foundation about two shades darker than your skintone and blend it into the hollows of your cheeks, your temples, just below your jawline, and around your hairline. I skipped blush, but you can use that here, too! Take a shimmery liquid highlighter and dab it on top of your cheekbones.

You'll see that I did my foundation after the eyes. This makes it easier to deal with fallout from the glitter, and that way the tape that you used for the wing doesn't take off any base you've put on already.

I don't know if you've noticed, but I've had a lip colour for each house, too: red for Gryffindor, nude for Hufflepuff, pink for Ravenclaw, and plum for Slytherin. The dark lips will appear again in the everyday look, though they'll probably be a little more subdued!

BROWS
Sugarpill Chromalust pigment in Junebug (forest green shimmer)

EYES
theBalm Put a Lid On It! eyeshadow primer, LA Splash Cosmetics eyeshadow sealer/base
Inner lid - Sugarpill Chromalust pigment in Tiara (metallic silver)
Outer corner - Sugarpill pressed eyeshadow in Midori (vibrant green with pearl sheen) + Sugarpill Chromalust pigment in Tipsy (grass green shimmer)
Glitter - Lit Cosmetics glitter in Hulk S2 (vivid emerald glitter) + Oslo Loose Diamond Glitter in Spark: Krystal (holographic silver glitter)
Waterlines - Urban Decay 24/7 Glide-On Eye Pencil in Perversion (matte blackest black)
Upper lash line - Maybelline Line Stiletto Ultimate Precision Liquid Eyeliner in Blackest Black
Lashes - Maybelline Volum' Express the Mega Plush mascara in Blackest Black
False lashes - Sugarpill False Eyelashes in Spark

FACE
Urban Decay Naked Skin liquid foundation in 1.0
Benefit boi-ing concealer in 01
Under eyes - Benefit Fake Up Concealer in 01 Light
Contour - Maybelline Fit Me foundation stick in 235 + NYX Powder Blush in Taupe (matte taupe)
Highlight - Benefit high beam

LIPS
Maybelline Color Sensational lipstick in Deepest Cherry (blackened cherry red)


06 January 2014

hogwarts series - hufflepuff (dramatic)

I live in the Midwest, so today we got hit by that polar vortex and the high for today was -10°F with a wind chill 25 degrees below that. Our furnace stopped working for a solid hour and I couldn't feel my fingers and toes indoors, but my dad found the issue and all was well! Since I knew today was going to be super cold, I decided today I needed to do the Hufflepuff look because I had plans to curl my hair.

Curling my hair is a full on production. Because I have very thick hair and it's a bit longer than I've had it in four years, it usually takes upwards of two hours for me to get all of my hair. I have to make the sections for each curl smaller since my hair is so thick--luckily, I was using a larger barrel. I think it was a 1 1/4" barrel, but I have cheap curling irons so I don't really know. I burnt my ear once and my fingers three or four times and had to enlist my sister's help for the very back of my head, but I managed to finish my whole head in 1.5 hours! I had everything pinned for too long so my hair was massive, but now it's finally settling down.


This photo is a little blurry, but the look itself is actually quite simple. I used some foundation and a bit of highlighting/contouring to make it seem like I have cheekbones to some degree. Concealer was an absolute must, as the redness would have been very obvious given the way I did my makeup.

I nearly forgot to fill in my brows for these photos. Originally, I wanted to use a matte charcoal eyeshadow for them, but I thought it might be too severe and too in competition with the eyes.


The key here is the eyeliner. I put on a white base for the yellow eyeshadow so the colour seemed more vibrant. All you need to do is pat colour on the lid up past the crease. I used a pencil eyeliner to line my upper and lower waterline in order to thicken the appearance of my lashes. Finally, I used a liquid eyeliner to create a basic cat-eye shape before I took the brush across the lid and under the eye, too. Go crazy with the shape! Don't get too artistic on one eye before you start on the second one--you want to keep it even, so trace a little on the left eye, then the right eye, and switch back and forth.

To round off the look, use a bit of blush and a nude lip colour.


BROWS
Benefit Instant Brow Pencil in Deep
Anastasia Beverly Hills Tinted Brow Gel in Granite

EYES
theBalm Put a Lid On It! eyeshadow primer
Lid - NYX Jumbo Eye Pencil in Milk (white) + Sugarpill pressed eyeshadow in Buttercupcake (bright matte yellow)
Liner - Sephora Collection Long-Lasting 12HR Wear Eye Liner in 01 Black (matte black)
Waterlines - Urban Decay 24/7 Glide-On Eye Pencil in Perversion (matte blackest black)
Lashes - Maybelline Volum' Express the Mega Plush mascara in Blackest Black

FACE
Urban Decay Naked Skin liquid foundation in 1.0
Benefit boi-ing concealer in 01
Contour - Maybelline Fit Me foundation stick in 235
Highlight - Benefit high beam
Under eyes - Benefit Fake Up Concealer in 01 Light
L'Oréal Paris Magic Smooth Soufflé Blush in Celestial (muted rosy pink)

LIPS
Obsessive Compulsive Cosmetics Lip Tar in Interlace (palest crème peach)


24 December 2013

look of the day - holiday cheer

It's been a rough couple of weeks for me, but it's the holiday season so I've brightened up a bit. My sister is home from university, as are the rest of my friends so I'll finally be able to see people! My cousin was over this past weekend but she jetted off to Florida for the week and now my godparents are here for the night.

My go-to look for the past few days, if I've even bothered with makeup, is just some BB cream and concealer, a defined brow, and my rms beauty Lip2Cheek in Diabolique applied as a lip stain and blush so I don't look like a total zombie. That was what I wore to pick up my sister from campus and I took a look at myself in a mirror and nearly shrieked at how dead I looked last week, whoops.

Today was a decent day so far and the sun was out despite it being obscenely cold. I didn't have to leave the house, though, so that was nice. I love the theory behind the holidays, but the practicality of trying to get around town makes me really frustrated. People seem to forgo the rules of the road and how to be civil and courteous, but it's just that time of year, I suppose.


I won't be leaving the house on Christmas since we've having our traditional big lunch at home, but if you have a party to attend, this is a great look! Since it's the holiday season, you can pull off bold eyes and a bold lip, and shimmer absolutely everywhere. This look is actually a bit toned down for what I'd wear to go to a Christmas party, but this way it can be tweaked for day or night. The eyes are very much focused on gold tones and a glitter/shimmer finish, while the lips are matte and very red. If you're going to be eating at the party, I'd definitely recommend either wearing a simpler lip or bringing lipstick to touch up through the night. I'm lazy and hate bringing my makeup with me anywhere, so I'd just go with a stain and call it a night.

BROWS
Anastasia Beverly Hills Beauty Express brow kit in Brunette
Anastasia Beverly Hills Tinted Brow Gel in Granite

EYES
theBalm Put a Lid On It! eyeshadow primer
Lid - Maybelline Color Tattoo Metal 24hr Cream Gel Shadow in Gold Rush 65 (yellow gold shimmer)
Inner corner - Urban Decay eyeshadow in Maui Wowie (metallic golden beige with silver glitter)
Outer corner + crease - Urban Decay eyeshadow in Smog (deep coppery bronze)
Waterlines - Urban Decay 24/7 Glide-On Eye Pencil in Zero (black)
Upper lash line - Hello Kitty Charmmy Kohl Eyeliner in Chocolate Milk (brown shimmer)
Lower lash line - Hello Kitty Charmmy Kohl Eyeliner in Bicycle (teal green shimmer)

FACE
Embryolisse Lait-Crème Concentrè + Dr. Jart+ V7 Beauty Balm
Under eyes - Benefit Fake Up concealer in 01 light
Benefit boi-ing concealer in 01
L'Oréal Paris Magic Smooth Soufflé Blush in Celestial (muted rosy pink)

LIPS
Bite Beauty Cashmere Lip Cream in Port (deep wine)


Happy holidays, my darling readers! Happy Christmas if you celebrate it and if you don't, I hope you have a wonderful few days.

15 December 2013

look of the day - blue brows and red lips?!

It's Sunday and there's about 5 inches of snow outside from the last few days, and though it's not snowing today, it's really hella cold. So naturally, I'm staying indoors trying to figure out what I want to do, and I decided I wanted to try out some of the new products I haven't touched.

Just the one picture today because there's nothing special about my eye makeup or anything, but you get to see the lovely Sugarpill ElektroCute neon pigment that I've used on my eyebrows and the Bite Beauty Cashmere Lip Cream on my lips. Sugarpill is obviously known for their highly pigmented products and their beautiful colours, and the neon pigments are no exception. I've used Hellatronic, a vibrant blue, for my brows and though I didn't even use that much product, it's still very bright. There is some fallout from the glitter in the product, so be advised if you use it for something that isn't just random usage. Also, it's important to note that the FDA has not tested or approved neon pigment for usage in the immediate eye area, although Canada and Europe have both deemed them safe. Use at your own discretion!

The lip cream, by the way, is highly recommended. I've been on a deeper red lip kick, so I bought it in Port, but they have a really nice pinkish red that would be awesome, too. Sancerre, I think it is? The consistency is really creamy and it's insanely pigmented. The only trick is that it can be difficult to apply, so I'd recommend lip liner if you don't have a steady hand. I'll do a full review some other time when I haven't decided I'm going to watch all the Game of Thrones commentaries in one go, or at least attempt it.


BROWS
theBalm Put a Lid on It! eyeshadow primer
Sugarpill ElektroCute neon pigment in Hellatronic (fluorescent indigo with red/purple/blue color-shifting super sparkles)

EYES
Upper lash line - Urban Decay 24/7 Glide-On Eye Pencil in Zero (black)

FACE
Urban Decay Naked Skin liquid foundation in 1.0
Benefit boi-ing concealer in 01
Under eyes - Benefit Fake Up concealer in 01 Light
Blush - Urban Decay eyeshadow in Grifter (sheer lavender shimmer with silver micro-glitter)

LIPS
Bite Beauty Cashmere Lip Cream in Port (deep wine)

10 December 2013

look of the day - sunrise

I really wanted to play with colour today, so I went ahead and did it! I spent the afternoon running errands and I had to wait in line at the post office for a half hour just to make a Christmas card, so I channeled my frustration into my makeup when I got home.

This look didn't start out drawing inspiration from anything except that I really wanted to colour in my brows a true red, and then I started forming a plan whilst in line. The eyes are definitely inspired by a sunrise, with a rich orange and yellow being the main colours.


I think this look could be very wearable if you just filled in your brows naturally and maybe went a bit more neutral on the lips, and maybe toned down the colours with a few more browns thrown in there. Or you can wear this the exact way it is!


The brows are a little sloppier than I had hoped, but my brows are unruly! The eyeshadow looks less bright when your eyes are open but once you close your eyes, the orange really hits you. I think the winged liner really adds to the look.

BROWS
Makeup Geek Gel Liner in Poison (matte rusty red)
Sugarpill pressed eyeshadow in @#$%! (vampy pearl red with silver metallic sheen)

EYES
theBalm Put a Lid On It! eyeshadow primer
SauceBox Cosmetics Temptation palette (orange shade on lid, yellow shade in crease)
Outer V + crease - Oslo Cosmetics loose eyeshadow in Ara (dark brassy red)
Upper lash line - Urban Decay eyeshadow in Oil Slick (matte black with silver micro-glitter)
Lower lash line - Urban Decay eyeshadow in Last Call (metallic sugar plum)
Inner corner - Urban Decay eyeshadow in Polyester Bride (white snow shimmer with silver micro-glitter)
Upper waterline - Urban Decay 24/7 Glide-On Eye Pencil in Perversion (matte blackest black)
Liner - Maybelline Line Stiletto Ultimate Precision Liquid Eyeliner in Blackest Black
Lashes - Maybelline Volum' Express the Mega Plush mascara in Blackest Black

FACE
Urban Decay Naked Skin liquid foundation in 1.0
Benefit Fake Up Concealer in 01 Light
Benefit boi-ing concealer in 01
Contour - Maybelline Fit Me foundation stick in 235

LIPS
NYX Soft Matte Lip Cream in Monte Carlo (deep cranberry red)
Maybelline Color Sensational Vivid lipstick in Electric Orange 880 (vibrant yellow-orange)


08 December 2013

look of the day - purple ombre eyebrows

Today was one of those strange days where I didn't quite know what was going on or what time it was. It was snowing outside, and for some reason it's currently almost half past six in the evening, but it really feels like it's much later.

I decided I wanted to play around with my eyebrows because they're currently a serious source of annoyance for me. I didn't realise that I did so many weird things with them! This went unnoticed until I recorded myself in a video and it was the one thing that bothered me the most. So instead of trying to make them cooperate, I decided to make them stand out.


Since my natural hair colour is black, trying to give my brows any sort of light colour tends to make them look a little funny. But I think the lilac purple doesn't look half-bad! I don't have any close-up photos because the eyes were completely unimportant in this look. Also, my glasses are chronically crooked, ugh.

BROWS
theBalm Put a Lid On It! eyeshadow primer
SauceBox Cosmetics Forbidden Fruits Palette (deep purple matte and lilac matte shades)

EYES
Lid - Urban Decay eyeshadow in Sin (champagne shimmer)
Crease - Urban Decay eyeshadow in Chopper (copper shimmer with silver micro-glitter)
Liner - Urban Decay 24/7 Glide-On Eye Pencil in Flipside (bright teal with silver-teal shimmer, discontinued)

FACE
Benefit Fake Up concealer in 01 Light
Benefit high beam
Maybelline Fit Me foundation stick in 110

LIPS
Rimmel London Lasting Finish Matte by Kate Moss lipstick in 107

19 October 2013

looks of the day - two looks inspired by lisa eldridge's videos!

So, after posting the last look inspired by one of Lisa Eldridge's looks, I saw her post about how she loved all of the photos that were being tagged #mylisalook and she set up a bit of a contest. (Look, my face is on her post!) It's been a few days but I just wasn't feeling like putting on makeup, especially with the cloudy weather over the past few days. But today, she posted a new video and I really wanted to try it! There's also a red eyeshadow video here that I just had to try because I'm all about the bright colours.


This look is very subtle but gorgeous for daily wear. I've been looking for every excuse to use the rms beauty lip2cheek in diabolique because I'm absolutely obsessed with it, and luckily it can be applied very sheerly for a nice berry tint to the lips. (Also, look at how I took this photo--I'm apparently in denial about my height despite the fact that I've been 5'3" for almost 8 years of my life...)

BROWS
Benefit Instant Brow Pencil in Deep
Anastasia Beverly Hills Tinted Brow Gel in Granite

EYES
Lid - Urban Decay eyeshadow in Half Baked (golden bronze)
Inner corner - thebalm eyeshadow in Snobby (yellow with gold shimmer)
Lash lines - Urban Decay 24/7 Glide-On Eye Pencil in Zero (black)
Lashes - Maybelline Volum' Express the Mega Plush mascara in Blackest Black

FACE
Embryolisse Lait-Crème Concentrè + Dr. Jart+ V7 Beauty Balm
Under eyes- Maybelline Fit Me concealer in 15 Fair
Benefit Fake Up concealer in 01 light
COVER FX Cream Concealer in N Extra Light
Contour - Maybelline Fit Me stick foundation in 235
Highlight - Benefit high beam
bareMinerals blush in t.t.y.l. (sheer poppy pink)

LIPS
rms beauty lip2cheek in diabolique (dark burgundy)

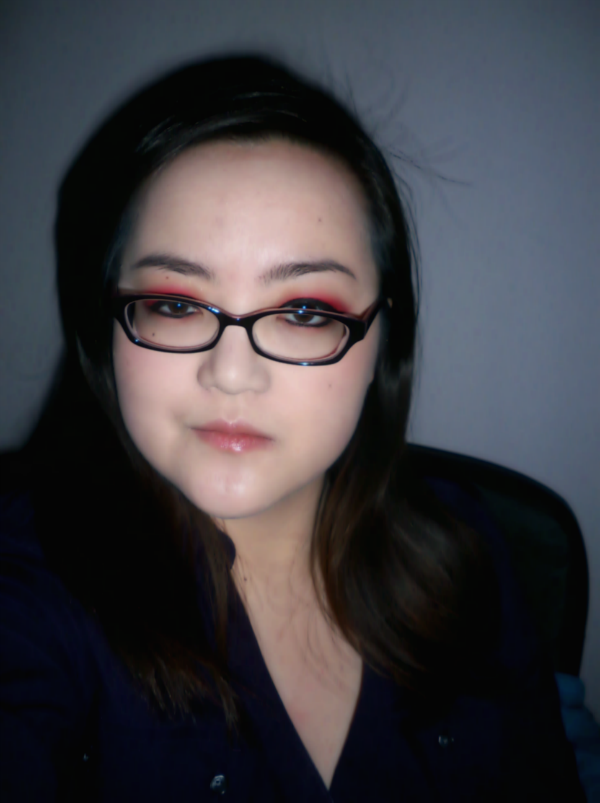
Since this was subtle, I was able to take it off with relative ease and put on the next look. Red eyeshadow is possibly one of my favourite things in the world but wearing it on a normal basis tends to earn you strange looks. Believe me, I've worn it a few times to class and people don't know what to say most of the time.


My glasses just make my eyes look even more misshapen. I've come to realise that I actually like a strong eye with a strong lip on me. I tend to think that with a nude lip, I actually look quite washed out because I'm so pale. So here's the look with some pink-red lips!

BROWS
Anastasia Beverly Hills Tinted Brow Gel in Granite

EYES
Sugarpill pressed eyeshadow in @#$%! (vampy pearl red with silver metallic sheen)
Liner - Urban Decay 24/7 Glide-On Eye Pencil in Perversion (matte blackest black), Maybelline Line Stiletto Ultimate Precision Liquid Eyeliner in Blackest Black
Lashes - Maybelline Volum' Express the Mega Plush mascara in Blackest Black

FACE
Urban Decay Naked Skin liquid foundation in 1.0
Benefit Fake Up concealer in 01 Light
NYX powder blush in Desert Rose (matte burgundy-pink)

LIPS
fresh Sugar Lip Treatment SPF 15
Sephora Rouge Cream Lipstick in The Red 04 (classic bright red)


I was going to do a third look, probably something for Halloween, but my eyeliner and my makeup remover wipe got into a catastrophic fight and I almost lost my eyeballs because of it. The skin around my eyes? Already a casualty. There was a great burning sensation as I was trying to take off all the black liner so I decided it was best to not do anything else!