Showing posts with label rms beauty. Show all posts

26 April 2014

orphan black clones series #3 - rachel duncan

Time for a third clone! So, I have to admit that Rachel fascinates me a lot, as she seems to be a bit of a red herring villain at the moment. That being said, I think her motives are rather unexplained and I can't wait to see what her real story is.


This look is based on this picture. I really tried to give a withering look but it just looks like I'm tired. Which is pretty close to the constant, pervasive truth! Obviously, I don't have blonde hair, nor is my hair short enough for a bob, so I improvised. I couldn't replicate the blonde, of course, but I put my hair into a faux-bob using this tutorial. My hair is incredibly thick so if I do this again, I'm going to leave less hair for the braid that is tucked underneath the rest of the hair, but otherwise it seemed to work well enough. (It looked so much better in person than in all of my photos...)

Rachel is very polished and since she's got blonde hair, her eyebrows seem to be a bit lighter than the other clones'. She's also got a bit of a tan in comparison with everyone else, and that might be more noticeable because of her hair colour. I had to apply bronzer all over my face, which looked HILARIOUS in natural lighting but didn't seem to do too much in flash photography.

For the eyes, take a very pale grey-brown shimmer shade and tap that into the inner corners of your eyes, drawing the colour out toward the center of your lids. Take a darker grey-brown shade to the rest of your lid. Using a matte brown shade, blend the colour into your crease and take the excess to your lower lids along the lash lines.

Take a flat liner brush (I used Wayne Goss' Brush 08, which is a ridiculously tiny push liner brush and I think I'm in love with it) and load it with a black cream liner, then tightline your upper lash line and line your lids. I used a pencil liner instead of a cream because I didn't want to open one up and have it dry out. Use a few coats of mascara on your upper lashes.

I spent a good ten minutes trying to find a lip colour that would mimic the one Rachel used and I think I got close, though hers appears to be more red-brown than mine, which leans more warm pink.


BROWS
Anastasia Beverly Hills Beauty Express brow kit in Brunette
Anastasia Beverly Hills Tinted Brow Gel in Granite

EYES
Too Faced Shadow Insurance
bareMinerals mineral veil
Inner corner - Urban Decay eyeshadow in Verve (oyster shimmer)
Outer lid - Urban Decay eyeshadow in Pistol (light gray-brown shimmer)
Crease - Urban Decay eyeshadow in Tease (pale brown matte)
Under eye - Urban Decay eyeshadow in Tease (pale brown matte) + Paula's Choice eyeshadow in Cafe Au Lait
Liner + waterlines - Urban Decay 24/7 Glide-On Eye Pencil in Perversion (matte blackest black)
Lashes - Maybelline Volum' Express the Mega Plush mascara in Blackest Black

FACE
Urban Decay Naked Skin liquid foundation in 1.0
Benefit boi-ing concealer in 01
Under eyes - Benefit Fake Up Concealer in 01 Light
Too Faced Milk Chocolate Soleil bronzer

LIPS
rms beauty lip2cheek in promise (warm salmon pink with golden shimmer)


12 February 2014

look of the day - cream + gold + green

This morning, I went to get a physical because I have a big girl job (!!!) and my arms are currently quite sore because I had to get a vaccine in each arm. I'm also piloting the Crimson Typhoon so no matter how much I try with my makeup, all of my photos make me look exceptionally ill. How is it possible for me to look any more pale?!

Now that I've given you too much information about my life, onto the look for today! My darling friend Livy requested a look with gold, green, and cream eyeshadow. I'll admit that I skipped the cream eyeshadow because every colour I had close to that was invisible on my skin, but I'll let you all know how to incorporate it into the look.


I was experimenting with overdrawing my lips here, too, so that's why my mouth looks different. (Note to self: don't try overdrawing with lip tar again.) Obviously, red lipstick is not a requirement for this look! I'm just sort of obsessed with the colour, plus Valentine's Day is coming up and even though I personally have no interest for the holiday, a red lip is suitable for any day.

Time for a mini-tutorial! After priming the lid, take a gold eyeshadow from the inner corner to about 1/3 to 1/2 across the lid. You can use a brush/sponge applicator to do this, or use your fingers like I did. I have a particular distrust of brushes for some reason, but I'm working on it. Take a medium green eyeshadow and pack it next to your gold eyeshadow, keeping the colour a bit further back from the outer corner of your eyelid. I used an olive green colour (aptly named Up All Night to Get Loki, as Livy is obsessed with Tom Hiddleston) but any green will do.

Take a black eyeliner or eye crayon and colour in the outer corner of your lid. Blend this like crazy--you're not getting a close-up of the look because I forgot to do this and it looks terrible. Whoops! After you blend this really well, take your green eyeshadow and pat it lightly onto the black base to give the shadow some depth. I happened to use a darker green eyeshadow than the Loki one, but I happened to have one on hand.

Go wild with black eyeliner. I chose to do winged liner with a liquid liner that has somehow yet to die, but you can just use a simple pencil and smudge that around your eyes. The sky is the limit! I also took a green liquid liner to my lower lash line, but that was me being ~fancy~.

You should use blush with this look so you're not washed out, especially if you do red lipstick! Somehow, even with blush I still look like Casper's ghost friend who learned how to paint her face, so um... Yeah, watch how you balance your look. I think a nude pink lipstick would look great, or if your lips are naturally quite pigmented like mine are, you can get away with some lip balm and call it a day.

If you have a cream eyeshadow and you're not a ghost like I am, you can place some in the inner corner of your eyelid to open up the eye, or blend it into the crease of your eye up to your browbone for a sick highlight.

Other possible combinations of cream + gold + green:
  • Cream over the lid, gold on the outer corner + crease, green along your lash lines
  • Green all over the lid with gold patted smack dab in the center of your upper lid
  • Cream into the inner corner, green all over your lid, gold along the lower lash line
  • Smokey eye! Green along the lash line brought up halfway on the lid, gold from there to the crease, and cream from the crease to your browbone


Since these colours are rather different from each other, make sure to blend like crazy, whatever you choose to do.

BROWS
Benefit Instant Brow Pencil in Deep
Anastasia Beverly Hills Tinted Brow Gel in Granite

EYES
theBalm Put a Lid On It! eyeshadow primer
Inner lid - Urban Decay eyeshadow in Half Baked (golden bronze)
Outer lid - Shiro Cosmetics loose eyeshadow in Up All Night to Get Loki (olive green with gunmetal shimmer)
Outer corner - Ulta Eye Crayon in Black Tie + Sugarpill Chromalust pigment in Junebug (forest green shimmer)
Upper lash line - Maybelline Line Stiletto Ultimate Precision Liquid Eyeliner in Blackest Black
Lower lash line - Stila Stay All Day® Waterproof Liquid Eye Liner in Moss (forest green)

FACE
Urban Decay Naked Skin liquid foundation in 1.0
Benefit boi-ing concealer in 01
rms beauty lip2cheek in diabolique (dark burgundy)
LUSH Cream Eyeshadow in Happiness (sunset copper shimmer)

LIPS
Obsessive Compulsive Cosmetics Lip Tar in Vintage (deep burgundy)

15 January 2014

hogwarts series - slytherin (everyday)

Today was pretty damn cold, so I think my fingers nearly froze off whilst driving around town. I'm currently rocking third-day hair and all I want to do is sleep for days, but alas, I forced myself to finish this final house look. I spent about an hour total coming up with this look, although I didn't know how to incorporate the green at first. I was lying in bed re-reading A Great and Terrible Beauty and it hit me--it need to go in the crease.


And again, forgive me for the laziness of my hair! It's kind of all over the place, but I did pin it back behind my ears to give it a semblance of effort. For some reason, you can't even see the bottom part of my hair in this picture... Womp. Anyway, this look was focused on the green eyeshadow in the crease blended up toward the eyebrows and the silver eyeliner on both the upper and lower lids. I used a shimmery white eyeshadow on the entire lid as a transition between the eyeliner and the green. The white doesn't translate well in photographs, though, possibly because I'm so pale that the flash just made it look like the rest of my skin. It does show in person, though!

The rest of the face was simple--foundation and concealer for coverage, a bit of highlighter on the cheekbones for a subtle glow, and a deep berry lip/cheek stain applied lightly for blush. The same stain is patted onto the lips several times to build the colour.

BROWS
Anastasia Beverly Hills Beauty Express brow kit in Brunette
Anastasia Beverly Hills Tinted Brow Gel in Granite

EYES
Lid - Beauty From the Earth Cosmetics loose eyeshadow in Glistening (creamy white with multi-coloured sparkles)
Crease - Sephora eyeshadow in N° 7 Picnic in the Park (grass green shimmer)
Liner - NYX Slide On Liner in Platinum (silver)
Waterlines - Urban Decay 24/7 Glide-On Eye Pencil in Perversion (matte blackest black)
Lashes - Maybelline Volum' Express the Mega Plush mascara in Blackest Black

FACE
Urban Decay Naked Skin liquid foundation in 1.0
Benefit boi-ing concealer in 01
Under eyes - Benefit Fake Up Concealer in 01 Light
Highlight - rms beauty living luminizer
rms beauty lip2cheek in diabolique (dark burgundy)

LIPS
rms beauty lip2cheek in diabolique (dark burgundy)


03 January 2014

hogwarts series - gryffindor (everyday)

So the snow has given us a one-day respite today, but unfortunately there are some absolutely ridiculous winds and so my idea of staying in to do makeup seemed like such a good plan... Until my mother and sister had me drive to the Arboretum so we could take some photos. The wind kind of ruined that for us, as all the snow on the trees was blown off but I got my first experience driving on really terrible streets and parking in a mall lot where no one could see the lines.

This look is super, super simple and doesn't need to have a Gryffindor label attached to it. It's effortless but looks really put together even if it only takes a few swipes of product.


Excuse the haphazard hair happening since I spent most of the car ride wearing a beanie-esque hat to keep it from blowing in my face! There were really only 6 main products used here, and most of them can be left out if you're in a rush. Four products were my BB cream for the face, concealer, brow pencil, and tinted brow gel, and all four of those are optional. What matters most is the gold cream eyeshadow and the red tinted lip product.

No eyeliner is necessary for this look! I picture most Gryffindors to be a little more haphazard and eyeliner can be too finicky. This look is definitely more carefree. You can definitely pile on mascara if you feel weird with no eyeliner--I almost remembered to put some on, but usually I can't be bothered, so I just completely forgot.

You don't have to be precise with the cream eyeshadow. Just a swipe over each lid with your fingers is fine! I used rms beauty's eyeshadow in solar, which is this lovely golden bronze shade, but you could just as easily use something like a Maybelline Color Tattoo. If your lids are oily, you might want to use a primer and set the cream with a powder, but I actually didn't wear the eyeshadow out. It did crease, though, as my lids are insanely oily, ugh. As for the lips, you might need a bit of a steady hand to keep the lines neat, but otherwise it's straightforward.

BROWS
Benefit Instant Brow Pencil in Deep
Anastasia Beverly Hills Tinted Brow Gel in Granite

EYES
rms beauty cream eyeshadow in solar (warm, golden bronze)

FACE
Embryolisse Lait-Crème Concentrè + Dr. Jart+ V7 Beauty Balm
Under eyes - Benefit Fake Up concealer in 01 Light

LIPS
Clinique Chubby Stick Intense Moisturising Lip Colour Balm in 03 Mightiest Maraschino (classic red)


07 December 2013

j.r.r. tolkien's the hobbit series #3 - elves simplified

Let me tell you that it is not easy trying to make yourself look as perfect as the elves in Lord of the Rings. They all look absolutely flawless, with glowing skin and hardly any makeup on. Now, as mere mortals, we have plenty of ways to fake it, but damn, is it hard to cover up undereye circles.

This look was based off of Arwen's look, which features a bit more colour than that of Galadriel, who was basically just a shining beacon of light, which was meant to be both beautiful and terrifying. Arwen has colour in her cheeks and lips.


This look was relatively simple and I loosely followed this tutorial by Alle from xoVain. The most work required is perfecting the skin, which is always a challenge. You want to look like you're glowing from within, so use a foundation that looks like skin or has some luminosity to it. Make sure to conceal any redness or unwanted spots. You want to use a highlighter or luminizer on the planes of your face that light would naturally hit: the bridge of your nose, your cheekbones, the Cupid's bow, and just below the browbone. Lightly contour your face if you weren't blessed with cheekbones and a jawline from the gods.

Blush is important here! Just on the apples of the cheeks. The eyes are very simple, with a dusting of an eyeshadow close to your skintone over your lid and some light definition in the crease with a slightly darker matte shadow. I didn't bother lining my upper lid but I did tightline the upper lash line to give the appearance of fuller lashes, and I put a but of a matte taupe liner below the bottom lash line for definition. Give your lashes a quick curl and a coat of mascara, and you're good to go. Also fill in your brows if you'd like, and if not, at least give them a swipe of brow gel to keep them in place.

Pick any lip colour that is close to your natural lip shade but maybe slightly pinker. I did use Clinique's Almost Lipstick in Black Honey, that cult favourite, but you can use any pinky nude.


I took these pictures while the sun was setting... Before 4PM. That is just not okay. I think I look really silly with filled-in brows and no eye makeup, but maybe that's just me. Also, my eyes are either uneven or I really just like cocking my brows, which is almost 115% the most likely choice. I realised that my eyebrows like to go crazy on a normal basis...

BROWS
Anastasia Beverly Hills Beauty Express brow kit in Brunette
Anastasia Beverly Hills Tinted Brow Gel in Granite

EYES
Lid - Urban Decay eyeshadow in Foxy (very light yellow/white matte)
Crease - Urban Decay eyeshadow in Tease (creamy pale brown matte)
Upper water line - Urban Decay 24/7 Glide-On Eye Pencil in Perversion (deepest matte black)
Lower lash line - Urban Decay 24/7 Glide-On Eye Pencil in Desperation (deep taupe to gray matte)
Lashes - Maybelline Volum' Express the Mega Plush mascara in Blackest Black

FACE
Urban Decay Naked Skin liquid foundation in 1.0
Yves Saint Laurent Touche Eclat foundation in Beige Rose 20
Benefit Fake Up Concealer in 01 Light
It Cosmetics Bye Bye Under Eye concealer in Light
Contour - Maybelline Fit Me foundation stick in 235 + NYX Powder Blush in Taupe
rms beauty living luminizer

LIPS
Clinique Almost Lipstick in Black Honey

03 December 2013

j.r.r. tolkien's the hobbit series #2 - elves

Greetings! It's been a long time since my last post. Last week was Thanksgiving (I hope you all had a good holiday if you celebrate, or a good start to Hanukkah, or you just had a good weekend. Maybe you all went shopping and I hope you got what you wanted!) and my sister was home for the week. Her first semester of university is almost over and it's weird.

I've been in a bit of a poor mood as of late, so I haven't had much inspiration to post anything. But I did do this look over a week ago and it's about time that I show you all! I'll admit that I'm not the most dedicated fan of LOTR or The Hobbit, if only because I was really behind in watching the LOTR trilogy and now I'm only just catching up. Regardless, everyone knows that the elves of Middle Earth are arguably the best race, and at the very least, they're certainly very pretty. Any mention of elves and I immediately think of how glowing and gorgeous they always are, and they're usually surrounded by blue tones.


This look focuses heavily on blue and white and is a bit heavier than what you'd see in the movies, but rest assured that it was intentional. In the first Hobbit film, the elves seem to be after their own interests, so they seem darker as a whole than they did in the LOTR films. In the second film, they feature heavily in the trailers and I'm really excited to see them in action, especially Thranduil the Khaleesi. (Come on, did you all see his sassy cape removal? It was straight out of Anastasia!)

I couldn't help myself--I had to pay homage to Lee Pace's fabulous eyebrows, so the brows in this look are darker than I usually do. The dark liner is in part inspired by Egyptian makeup, but the double liner also serves as a reminder that the elves aren't always there to be the good guys. The most important part of this look is the glitter.


LOOK AT HOW IT SPARKLES. For some reason, the little curlicues I drew on with a sparkling white shadow were hardly visible unless I did a close-up like this. If you look closely, there's one underneath my eye. I would advise drawing these in with a white eyeliner and then putting eyeshadow over that if you want it to look more noticeable!


  1. Apply foundation as necessary. Elves seem to have consistently flawless, glowing skin, so you're aiming for that sort of look. Don't use a matte foundation if you can avoid it. Instead, look for something more luminous.
  2. Conceal any dark spots or redness that you have. Your skin should look like a blank canvas!
  3. Prime your eyelid. I was being really bratty with my eyeshadow choices and decided I needed to use three different colours that ended up looking almost the same in these photos, so feel free to just pick one light, blue-based, iridescent eyeshadow for your entire lid. I really recommend something like Sugarpill Lumi because it's one of the best investments you could make in an eyeshadow.
  4. Tightlining your upper lashline with a black liner is optional, but it will help make the look more cohesive. Using either a dark, metallic blue eyeliner (Urban Decay has several and I know that other brands will likely have good ones, as well) or a dark blue eyeshadow with a damp brush, line your upper lid. Extend the line outward and upward to your liking.
  5. Repeat the previous step on the lower lid.
  6. Now to add some glitter. Lit Cosmetics has a liquid glitter base that you use to make the glitter stay on, but it really depends on what you use. I think their base is excellent and provides a really good foundation for the glitter. Line the upper lid over the previous eyeliner with whatever base you're using, and then apply deep blue glitter over it.
  7. Line your lower waterline with a white eyeliner to make your eyes pop.
  8. Using a loose white/blue eyeshadow with a damp brush, draw on as many curlicues as you'd like around the eye area. If you're as pale as I am, they might not show up too well. I would suggest drawing them in with a white eyeliner first and then going over them with the eyeshadow.
  9. Fill in the space between the upper and lower winged liner with glitter base. Take a clear iridescent glitter and pat it over that space.
  10. Curl your lashes and put on a few coats of mascara. Use a waterproof formula over a regular one if you're wearing this look to the movies! (I wouldn't advise it, as the dark liner might travel quite a bit down your face, but do whatever your heart desires.)
  11. Fill in your brows. You don't have to go as heavily in as I did, but I wanted to make it dramatic so the eyes didn't wash me out. I also tipped my brows with some iridescent shadow after applying a brow gel and waiting until it was tacky, but I don't think you can actually tell the difference in these photos or in real life.
  12. Blush is optional! You want a lip colour that won't complete with the strong eye and the strong brow, so apply a nude colour. Nude doesn't necessarily mean concealer coloured lips, either--think a my-lips-but-better shade, so something a little more pink, and don't be afraid to go a little more pigmented if your natural lip colour is very pink.

BROWS
Anastasia Beverly Hills Beauty Express brow kit in Brunette
Anastasia Beverly Hills Tinted Brow Gel in Granite
Oslo Cosmetics loose eyeshadow in Dark Days: Pyxis (light iridescent duochrome pink-violet)

EYES
Lid - Shiro Cosmetics loose eyeshadow in Nestyr (violet-lavender with blue shimmer, discontinued)
Center of lid - Fyrinnae loose eyeshadow in Jade Ghost (white-green shimmer)
Crease - Sugarpill Chromalust pigment in Lumi (snow white with turquoise sheen)
Upper lash line - Urban Decay 24/7 Glide-On Eye Pencil in Perversion (deepest matte black)
Liner - Sugarpill Chromalust pigment in Magpie (black with metallic blue sheen) + Lit Cosmetics glitter in Elton Jon S2 (matte peacock teal glitter)
Lower waterline - Urban Decay 24/7 Glide-On Eye Pencil in Yeyo (metallic white)
Decoration - Lit Cosmetics glitter in Barbie Shops S3 (clear iridescent glitter) + Fyrinnae loose eyeshadow in Otherworld (pale aqua shimmer)
Lashes - Maybelline Volum' Express the Mega Plush mascara in Blackest Black

FACE
Urban Decay Naked Skin liquid foundation in 1.0
Benefit boi-ing concealer in 01
Maybelline Fit Me foundation stick in 235

LIPS
rms beauty lip shine in moment (light rose-brown)
Buxom Full-On Lip Cream in White Russian (nude pink)


You can see that there isn't much colour on the lid. Most of the eyeshadows I used rely on duochrome and iridescence, so certain angles will show more saturation and different shades. I also had a lot of transfer from the liner onto my crease, so that's why it's kind of darker than I had originally planned. Whoops!

I think I'll do an elf look that is more based on what Galadriel and Arwen (and Tauriel, though her look seems more simple) wear in the films, so keep an eye out for that!

19 October 2013

looks of the day - two looks inspired by lisa eldridge's videos!

So, after posting the last look inspired by one of Lisa Eldridge's looks, I saw her post about how she loved all of the photos that were being tagged #mylisalook and she set up a bit of a contest. (Look, my face is on her post!) It's been a few days but I just wasn't feeling like putting on makeup, especially with the cloudy weather over the past few days. But today, she posted a new video and I really wanted to try it! There's also a red eyeshadow video here that I just had to try because I'm all about the bright colours.


This look is very subtle but gorgeous for daily wear. I've been looking for every excuse to use the rms beauty lip2cheek in diabolique because I'm absolutely obsessed with it, and luckily it can be applied very sheerly for a nice berry tint to the lips. (Also, look at how I took this photo--I'm apparently in denial about my height despite the fact that I've been 5'3" for almost 8 years of my life...)

BROWS
Benefit Instant Brow Pencil in Deep
Anastasia Beverly Hills Tinted Brow Gel in Granite

EYES
Lid - Urban Decay eyeshadow in Half Baked (golden bronze)
Inner corner - thebalm eyeshadow in Snobby (yellow with gold shimmer)
Lash lines - Urban Decay 24/7 Glide-On Eye Pencil in Zero (black)
Lashes - Maybelline Volum' Express the Mega Plush mascara in Blackest Black

FACE
Embryolisse Lait-Crème Concentrè + Dr. Jart+ V7 Beauty Balm
Under eyes- Maybelline Fit Me concealer in 15 Fair
Benefit Fake Up concealer in 01 light
COVER FX Cream Concealer in N Extra Light
Contour - Maybelline Fit Me stick foundation in 235
Highlight - Benefit high beam
bareMinerals blush in t.t.y.l. (sheer poppy pink)

LIPS
rms beauty lip2cheek in diabolique (dark burgundy)

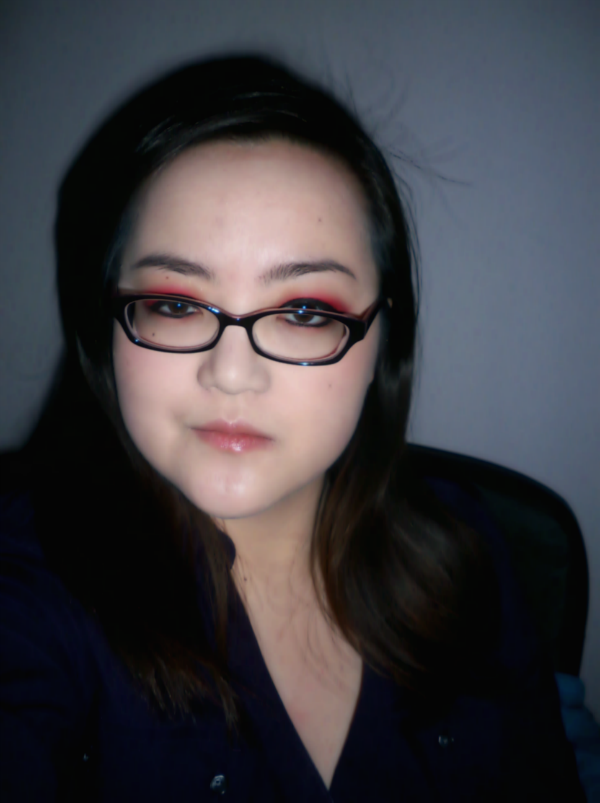
Since this was subtle, I was able to take it off with relative ease and put on the next look. Red eyeshadow is possibly one of my favourite things in the world but wearing it on a normal basis tends to earn you strange looks. Believe me, I've worn it a few times to class and people don't know what to say most of the time.


My glasses just make my eyes look even more misshapen. I've come to realise that I actually like a strong eye with a strong lip on me. I tend to think that with a nude lip, I actually look quite washed out because I'm so pale. So here's the look with some pink-red lips!

BROWS
Anastasia Beverly Hills Tinted Brow Gel in Granite

EYES
Sugarpill pressed eyeshadow in @#$%! (vampy pearl red with silver metallic sheen)
Liner - Urban Decay 24/7 Glide-On Eye Pencil in Perversion (matte blackest black), Maybelline Line Stiletto Ultimate Precision Liquid Eyeliner in Blackest Black
Lashes - Maybelline Volum' Express the Mega Plush mascara in Blackest Black

FACE
Urban Decay Naked Skin liquid foundation in 1.0
Benefit Fake Up concealer in 01 Light
NYX powder blush in Desert Rose (matte burgundy-pink)

LIPS
fresh Sugar Lip Treatment SPF 15
Sephora Rouge Cream Lipstick in The Red 04 (classic bright red)


I was going to do a third look, probably something for Halloween, but my eyeliner and my makeup remover wipe got into a catastrophic fight and I almost lost my eyeballs because of it. The skin around my eyes? Already a casualty. There was a great burning sensation as I was trying to take off all the black liner so I decided it was best to not do anything else!

14 October 2013

look of the day - autumn trends

I originally wanted to make another Halloween look today, specifically a monkey look, but I ended up helping my mom in the kitchen for over two hours and all the pictures I Googled for inspiration did nothing. The really good ones required prosthetics (or liquid latex, at the very least, and I don't have any of that lying around!) and the others just weren't cutting it. So instead, I did a look with some of the products I mentioned in this post about my favourites for fall.


When you've worn glasses for 17 of your 22 years of life and then start taking photos without them on, you realise the harsh truth: dark circles exist. My glasses have covered them for my entire life--either them or their shadow, and now I take photos and remain bewildered when I look like I haven't slept in weeks.


I had a lot of fun with this look regardless. I wanted to put a little sparkle in my brows and originally intended to use Sugarpill's Goldilux, but I found the Shiro shadow and thought that it would be slightly more subtle. Besides, I intend to attempt a gold brow look like Dior's during S/S 14 fashion week.

Also, go out and get RMS Beauty's lip2cheek in Diabolique right now. It's limited edition but it's so perfect for fall that I now own two in case they don't make it permanent like so many people are begging for them to do. I used the slightest bit on my cheeks and it made for such a pretty flush.

BROWS
Urban Decay eyeshadow in Hustle (mocha shimmer)
Anastasia Beverly Hills Tinted Brow Gel in Granite
Shiro Cosmetics loose eyeshadow in Nic Cage Raking Leaves on a Brisk October Afternoon (coffee brown-black with gold and red sparkles)

EYES
Inner lid - Urban Decay eyeshadow in Half Baked (golden bronze)
Outer lid -  Urban Decay eyeshadow in Smog (golden brown shimmer)
Crease + lower lash line - Makeup Geek pigment in Enchanted (light plum shimmer)
Upper waterline - Urban Decay 24/7 Glide-On Eye Pencil in Perversion (matte deepest black)
Inner corner - NYX Slide On Liner in Glitzy Gold (pure gold)

FACE
Urban Decay Naked Skin Weightless Ultra Definition Liquid Makeup in 1.0 (very fair bisque, soft warm undertones)
Benefit boi-ing concealer in 01
rms beauty lip2cheek in diabolique (dark burgundy)

LIPS
rms beauty lip2cheek in diabolique (dark burgundy)