Showing posts with label sephora. Show all posts

23 August 2014

(belated) look of the day - curls and red lipstick

This look was actually from last Sunday, 17 August, but I forgot to post it.


This isn't any different from this previous look in terms of makeup, although I used a lip liner for the lips in addition to the lipstick. I wanted to post this partially to say that I bought the new Urban Decay Pulp Fiction lip liner and lipstick and they're FANTASTIC, and partially to say that I also bought the Sultra the Bombshell 1-inch curling rod and even though it was a bit pricey, it took a fourth of the time it usually takes to curl my hair.


BROWS
Anastasia Beverly Hills Dipbrow pomade in Dark Brown

EYES
Too Faced Shadow Insurance
Lid - Urban Decay eyeshadow in Foxy (very light yellow/white matte)
Outer corner - Urban Decay eyeshadow in Naked2 (taupe matte)
Crease - Urban Decay eyeshadow in Faint (warm, dusty brown matte)
Waterline - Urban Decay 24/7 Glide-On Eye Pencil in Perversion (matte blackest black)
Liner - Sephora Colorful Waterproof Eyeliner 24 HR Wear in 01 Black Lace (matte black)
Lashes - Maybelline Volum' Express the Mega Plush mascara in Blackest Black
Under eyes - Maybelline Fit Me Concealer in 15 Fair

FACE
Urban Decay Naked Skin liquid foundation in 1.0
Benefit boi-ing concealer in 01
NYX Cosmetics blush in Desert Rose
Highlight - Benefit Watt's Up
Contour - Maybelline Fit Me foundation stick in 235

LIPS
Urban Decay Pulp Fiction™ 24/7 Glide On Lip Pencil in Mrs. Mia Wallace (deep blood red)
Urban Decay Pulp Fiction™ Revolution Lipstick in Mrs. Mia Wallace (deep blood red)

10 August 2014

look of the day - purple vamp

My hair is looking sad and so is my bank account, so I won't be re-dyeing it until I get my hands on some new Manic Panic. To cheer myself up, I did a vampy makeup look, which is really what I gravitate toward most days but I can't really get away with it at work.


For the eyes, it's a bit of a typical smoky eye where the darkest colour is closest to the lashes. I used a midtoned plum shimmer from the lash line up to between the brow bone and the crease, and a dark, blackened purple with iridescent glitter from the lash line to the crease. The most important part of smoky eyes is blending! Make sure to blend each colour into the next so you get a nice gradient. Blend with a clean brush each time. Use a matte purple eyeshadow to blend in some colour on your lower lids.

Take a black pencil eyeliner and line your waterlines, top and bottom. (Feel free to skip this step if you're not comfortable with this!) Take a black cream or gel eyeliner and draw out serious wings at the outer corners of your eyes. Feel free to go a little crazy since you've got such dark eyeshadow on anyway. Line your lower lash lines, too, and extend the line past the corner of your eye. Finish with a few coats of mascara.

For the lips, take a dark burgundy lipstick and fill in most of your lips with it. Then, using a black lipstick and a lip brush, line your lips and blend the two colours together. Because my lips are naturally quite pigmented, I had to cover them with some foundation so my lip line wasn't obvious.

Most people would want to balance this with a tad of blush or some contouring. I skipped both because I was bored and really wanted to get all the black eyeliner off in less than a half hour, but if I didn't get so impatient, I would've done some contouring around my cheeks and the perimeter of my face.

BROWS
Anastasia Beverly Hills Dipbrow pomade in Dark Brown

EYES
Too Faced Shadow Insurance
Inner corner - Urban Decay eyeshadow in Sin (champagne shimmer)
Lid up to below brow bone - Makeup Geek pigment in Enchanted (light plum shimmer)
Lid up to crease - Sephora eyeshadow in N° 22 Fireworks (black purple with iridescent glitter)
Liner - Inglot Cosmetics AMC Eyeliner Gel in 77 (matte jet black)
Lower lid - Sigma Beauty Flare palette: Gossip (plum matte) + Allure (warm bright purple matte)
Waterline - Urban Decay 24/7 Glide-On Eye Pencil in Perversion (matte blackest black)
Lashes - Maybelline Volum' Express the Mega Plush mascara in Blackest Black
Under eyes - Maybelline Fit Me Concealer in 15 Fair

FACE
Urban Decay Naked Skin liquid foundation in 1.0
Highlight - Benefit Watt's Up

LIPS
Wet N' Wild Fantasy Makers lipstick in Black
Geek Chic Cosmetics JoyStick in Stay Classy (velvet burgundy)


01 August 2014

look of the week - new hair!

So, remember how I was blonde for two weeks? Well, that's not the case anymore.


Here's my sunset hair! It's a little dark in this photo, but my hairdresser put in purple, pink, and orange semi-permanent dye and left one piece and my bangs blonde. This was done on Sunday, 27 July. (The only makeup I'm wearing here is Anastasia Dipbrow in Dark Brown and OCC Stained Gloss lip tar in New Wave.)


And here's the back! He curled it a bit so the colours blended more.

Two days later, I put it into a side ponytail and accidentally turned myself into a rainbow because I was wearing green eyeshadow and a blue sweater, but when I got home, I just put blue eyeliner on instead of wearing the sweater.


The makeup here is Dr. Jart+ V7 BB cream, Anastasia Dipbrow in Dark Brown, Sugarpill loose eyeshadow in Olivia (a limited edition olive-green shimmer), Urban Decay eyeliner in Flipside (a discontinued bright teal with silver-teal shimmer), a black Sephora liquid liner, and Kat Von D liquid lipstick in Bauhau5 (deep raspberry).


I washed it Tuesday night and then had the genius idea to put in a clear gloss to protect the colour. Turns out that just faded it even more quickly and I didn't even wash all the gloss out, so I almost gave myself a peroxide burn on my scalp. WHOO! So this is what my hair currently looks like:


Man, those dark circles. And that faded hair. I'm wearing some combination of Sugarpill loose eyeshadows (Magpie, Royal Sugar, Weekender, and Smitten, I think?) to invoke the deeper end of a sunset and possibly allude to what I might do with my hair later on. Additional makeup: Anastasia Dipbrow in Dark Brown and Lipstick Queen Butterfly lipstick in Float.

All I'm really saying is that I really love this hair and while I'm sad it's fading so quickly, I'm glad I get the opportunity to play with colours. Any suggestions for what to do next with my hair? I'm stocking up on Manic Panic!

Also, this weekend I should be posting a mega post about eyebrows. It might be my legacy, and it also might be approaching 4k.

20 July 2014

looks of the weekend - simple summer look + helena (bonus blonde hair!)

I wasn't even going to post anything because this is just a transition hair colour until I get the rest of the dye put in next weekend, but I couldn't pass up the opportunity, really.

First, here's what my go-to summer look has been.


Yes, I am wearing the garland I bought at the nearby Renaissance Faire the first time I went! And hello, blonde hair. My hairdresser didn't want me to be stuck in a chair for 4-5 hours getting all the dye in, so my next appointment is next weekend. This time next week, I'll have purple + pink + orange hair!

Since it's summer, I don't really bother with foundation or any sort of face product except for sunscreen. I'd rather protect my skin than try to bother covering anything up. That being said, I did use tiny dots of concealer where I really needed it. Sometimes I use an under-eye concealer, but I didn't here.

For the eyes, take a simple nude-pink shimmer eyeshadow and swipe it across your lids, and then use a liquid eyeliner to draw on a slight cat-eye. Often, I skip eye makeup entirely because it'll crease like crazy in the summer with my oily lids. Brows are a must for me, though! Lately I've been using Anastasia's Dipbrow Pomade, which has been a lifesaver.

Summer is the time for bright lips so I slapped on a long lasting liquid lipstick so I wouldn't have to worry about touch-ups. This stuff lasts through everything.

BROWS
Anastasia Beverly Hills Dipbrow pomade in Dark Brown
Anastasia Beverly Hills Tinted Brow Gel in Granite

EYES
Stila eyeshadow in Kitten (shimmering nude pink)
Sephora Colorful Waterproof Eyeliner 24 HR Wear in 01 Black Lace (matte black)

FACE
Maybelline Fit Me Concealer in Fair 15

LIPS
Kat Von D Everlasting Love Liquid Lipstick in Bauhau5 (deep raspberry)


I know I did Helena's makeup once already, but since I have blonde hair for a brief window, I had to try it again.


The eyeshadow looks a little less red in the picture than in person, but I used a lighter hand this time. The band shirt isn't quite The Clash (sorry Sarah!) but Company of Thieves is the only band I have a shirt for, so it'll have to do.

BROWS
Anastasia Beverly Hills Dipbrow pomade in Dark Brown
Anastasia Beverly Hills Tinted Brow Gel in Granite

EYES
Urban Decay Naked Basics Palette: Faint (warm, dusty brown matte)
It Cosmetics Naturally Pretty Matte Luxe Transforming Eyeshadow Palette Vol. 1: Soulful, Sunrise, Sunset
Saucebox Cosmetics Etude palette: Biscotti, Caramel, Cream Dream
Lorac PRO To Go Eye/Cheek Palette: Café

FACE
Urban Decay Naked Skin liquid foundation in 1.0
It Cosmetics Bye Bye Under Eye concealer in Light

LIPS
NYX Cosmetics Soft Matte Lip Cream in Cairo (matte pure nude)
Urban Decay Revolution lipstick in Naked (nude-pink)

16 June 2014

(belated) look of the day - BEST EYESHADOW POSSIBLY EVER

Disclaimer 1: This look was from Saturday. I took the pictures and rushed out of the house and just completely forgot to write this post.
Disclaimer 2: The title is misleading, probably. I'm just kind of obsessed with this colour and want to use it in everything.

Disclaimer 3: I just wanted a third disclaimer.

Saturday was my best friend Katina's graduation/birthday party, so naturally, I was later than intended because I had to do my makeup. I ordered a package from Beautylish on Wednesday at about 10PM and it was at my front door on Friday around 5PM. Their customer service is PHENOMENAL. On two separate occasions, I had something happen to my packages (a lipstick in the wrong shade was mailed and a face oil had leaked) and on both occasions, they were so nice about it that they just gave me replacements free of charge. Seriously, go check it out.

Anyway, so I took the advice of Phyrra who advised everyone to get this eye shadow and I just have to say that I wholeheartedly agree, even if my greasy lids made it crease after some undetermined time. (I wasn't close to a mirror to check it until right before I left Katina's house around 10:30PM and I did my makeup about 12 hours prior.)


I should have taken better pictures but I was already running late.

Anyway, this look was actually quite simple. Take a copper cream eyeshadow and tap that into your inner corner and blend it toward the center of your eyelid, then take the Inglot pigment in 81, the most gorgeous copper-pink metallic shade, and press that on top and toward the outer corner of your lids. Next, take a darker matte taupe shade and blend that into the outer corner of your lids. I used several shadows to achieve the effect I wanted, but if you have a trusty darker taupe, just use the one and save yourself some trouble. Create whatever shape suits you--I just blended it out without really caring what the shape was and that worked out just fine, but if you want to be more precise, go for it. Blend the matte taupe shade into the metallic shade and please, do a better job than I did.

I didn't bother with mascara because it was going to be warm outside, but I did use a thin flat liner brush to tightline my upper lash line. The gold eyeliner on the lower lash line is optional, but I thought it rounded out the look a bit.

My eyebrows are actually purple here, but the flash makes them look a bit more brown. I also didn't put on blush, but the lip colour is lighter to balance out the slightly heavier eye.

BROWS
Inner half - Laura Mercier eyeshadow in Plum Smoke (matte smoky amethyst)
Outer half - Sephora eyeshadow in Blueberry Muffin No 30 (black plum matte)
Anastasia Beverly Hills Tinted Brow Gel in Granite

EYES
Too Faced Shadow Insurance
Inner half - LUSH Cream Eyeshadow in Happiness (sunset copper shimmer) + Inglot Cosmetics AMC Pure Pigment Eye Shadow in 81 (metallic copper-pink)
Outer half - Sigma Beauty eyeshadow in Hitch (matte medium-dark ash-brown) and Snoop (matte dove grey)
Upper lash line - Urban Decay 24/7 Glide-On Eye Pencil in Perversion (matte blackest black)
Lower lash line - NYX Slide On Liner in Glitzy Gold (pure gold)
Under eyes - Maybelline Fit Me Concealer in 15 Fair

FACE
Urban Decay Naked Skin liquid foundation in 1.0
Benefit boi-ing concealer in 01

LIPS
Geek Chic Cosmetics JoyStick in The Last Cetra (metallic purple-toned light pink)


17 May 2014

orphan black clones series #4 - cosima niehaus

Wow, it's been a while, hasn't it?

I have excuses that you don't care to hear for all of it, but I do have to say that I did this look before a graduation party I'm going to shortly and holy hell does it take a long time to try to finagle my hair into "dreads". And by dreads, I mean I did a few crappy twists around the top of my head and gathered the rest of my hair into a ponytail because my hair is impervious to styling unless I fry it.

Cosima has the coolest look, in my opinion, although my personal look leans more toward Sarah. (You'll see that once I link my post-Cosima makeover picture.) Obviously I don't have dreadlocks, but her eyeliner is amazing.


The dumb thing is that you can't even see my hair! Well, Cosima's makeup is actually rather straightforward. Take a liquid liner (black is the most common, of course, but if you have a navy liner, that's what the makeup artists on the show use!) and line your upper and lower lash lines. Then extend the line on the upper lid outward to create a wing, and extend the line on the lower lid toward your nose. Now, I know that for Cosima's makeup, the eyeliner on both lids is connected in both the outer and inner corners, but since my eyelids are hooded everywhere except the inner corner, where they're more monolid-like, I didn't connect the inner corners. If you don't have this issue, you can connect the lines easily.

I used a black liquid liner, so after the shape was created, I used a navy pencil liner and a thin liner brush to outline the shape and give it the correct colour. It doesn't seem like Cosima wears much other makeup, but I did use a bit of a nude lip colour to lighten up my natural lip colour. (I put on a layer of a light OCC lip tar and then dabbed on a nude/mauve Bite lipstick over that.)

BROWS
Anastasia Beverly Hills Beauty Express brow kit in Brunette
Anastasia Beverly Hills Tinted Brow Gel in Granite

EYES
Too Faced Shadow Insurance
bareMinerals mineral veil
Liner - Sephora Collection Long-Lasting 12HR Wear Eye Liner in 01 Black (matte black) + Urban Decay 24/7 Glide-On Eye Pencil in Binge (pearly navy blue, discontinued)

FACE
Missha Perfect Cover BB Cream in No. 13 Bright Beige
Benefit boi-ing concealer in 01

LIPS
Obsessive Compulsive Cosmetics Lip Tar in Interlace (palest crème peach)
Bite Beauty Lipstick in Pepper (dusty rose)


After I took my hair down and changed (and put a tiny Dutch braid where my part normally is), this is what happened. I went from Cosima to Sarah-as-Cosima!

13 April 2014

look of the day - purple wedding

IT'S A LOVELY DAY FOR A PURPLE WEDDING.

I'm going to try not to spoil anyone who hasn't read the A Song of Ice and Fire series, but I'm just saying that I'm so excited for tonight's episode of Game of Thrones that I had to base a look on it. And I might be on the verge of throwing up because I'm so excited.


The brows were done like the ones in this previous look. For the eyes, all you need to do is take a shimmery purple eyeshadow and apply that to the inner half of your lid and then take a shimmery charcoal shadow to the outer half. I was finicky and had to use two different purple eyeshadows and a shimmery white eyeshadow in the inner corner. All eyeshadows were Sugarpill because they're fabulous.

Using the purple eyeshadow, trace your lower lash line. Then take a black eyeliner and line your upper and lower waterlines. You don't want to go too overboard with the eyeliner because you're already wearing a smoky eye with a dramatic lip, but of course, if you want to forego the purple lipstick, feel free to line your eyes a little more heavily.

Excluding the usual foundation/concealer routine (I tried Wayne Goss' tip about putting powder on before foundation), all I used on my face was a foundation a few shades darker than my skin tone for contour and a touch of blush on my cheeks.

Because the lips are so dramatic and vibrant, it's probably a good idea to wear lip liner if you plan to wear it out. I left that step out, but since purple liners aren't that openly available, a clear lip liner would be great. (I prefer cruelty-free brands, but if you don't mind that as much, MAC has some purple liners. NYX is a good cruelty-free option that is also easy on the wallet! I know there are a bunch of other brands out there, too, but I'm forgetting them all.)

BROWS
Inner corner - Laura Mercier eyeshadow in Plum Smoke (matte smoky amethyst)
Inner brow - Sephora eyeshadow in Blueberry Muffin No 30 (black plum matte)
Outer brow - Anastasia Beverly Hills Brow Powder Duo in Brunette (darker shade)

EYES
Too Faced Shadow Insurance
Inner corner - Sugarpill pressed eyeshadow in Diamond Eyes (satin white with crystalline sheen)
Inner lid - Sugarpill Chromalust pigment in Weekender (metallic blue-violet)
Center of lid + lower lash line - Sugarpill pressed eyeshadow in Elemental Chaos (deep grape shimmer with iridescent blue undertones)
Outer corner - Sugarpill pressed eyeshadow in Soot & Stars (metallic gunmetal with prismatic sparkle)
Waterlines - Urban Decay 24/7 Glide-On Eye Pencil in Perversion (matte blackest black)

FACE
bareMinerals Prime Time foundation primer
bareMinerals mineral veil
Urban Decay Naked Skin liquid foundation in 1.0
It Cosmetics Bye Bye Under Eye concealer in Light
Maybelline Fit Me Concealer in 15 Fair
Contour - Maybelline Fit Me foundation stick in 235
Too Faced Sweethearts Perfect Flush Blush in Candy Glow

LIPS
Revlon Colorburst Matte Balm in 215 Shameless
Corners of lips - NYX Cosmetics Soft Matte Lip Cream in Transylvania (matte deep violet)


WHO ELSE IS EXCITED?! Please come talk to me if you've read the books and are super pumped like I am!

05 April 2014

sephora vib rogue spring social + look of the day - GAME OF THRONES IS TOMORROW

Quick, let me write up a post about the Sephora VIB Rouge Spring Social before I forget everything! I wish I brought a camera so I could take pictures, but I left in a hurry and totally forgot.

Sunday, 30 March was the start of the VIB Rouge sale and Sephora stores across the country held a closed-door event for the most dedicated to beauty. I RSVPed at the store where my friend Erica works because it happens to be bigger than the one in my hometown's mall. It was two hours of being in a Sephora store, complete with coffee and snacks. (Neither of which I got, as I don't drink coffee and I was sort of so caught up in makeup that I forgot to pick up food. Whoops!) There were stations for facials, hairstyles, and makeup applications and all the employees were so welcoming and helpful.

I was very overwhelmed at first, but after I woke up a bit, I went to the facial station first. They had three options: anti-aging, brightening, and detox. I chose detox because my skin has been freaking out all winter. I don't remember the cleanser they used, but it smelled wonderful and didn't really irritate my skin. The woman helping me asked about how my skin has been and I told her about how my skin has been freaking out all winter--it's normally combination leaning oily everywhere except for my cheeks--how there have been a lot of dry patches for no reason and she asked about exfoliation. I have a scrub that I use occasionally, but lately I've been using my Clarisonic a little more often, and she told me that I might need to use another product on top of the Clarisonic since that only provides mild exfoliation. She used the First Aid Beauty Facial Radiance Pads for this. Next, she put a mask on (Perricone MD Chloro Plasma mask) for a minute or two, then put on a Dr. Brandt eye cream. I don't exactly know what the product was, but I'm guessing that it was the Xtend Your Youth eye cream. She finished off with some Kate Somerville Dilo Oil Restorative Treatment and Shiseido Ibuki Protective Moisturiser Broad Spectrum SPF 18.

Now, I'm a bit of a dumbass and should have asked her about the SPF before she put it on because chemical sunscreens make me peel, and that's exactly what was in this one. It was mild, but I know for a fact that octinoxate irritates my skin, but I didn't react quickly enough. Whoops!

Another big oops: I shouldn't have gotten my foundation matched right after getting my face cleaned and rubbed and all that because I got a match for something MUCH darker than I have ever used. (2R05, if that means anything to any of you. I was expecting to be 1Y03.) The foundation that they used was MUFE's Liquid Lift foundation in 1 Porcelain, which seemed to work out all right, but another match was Cover FX cream foundation in N40 which is definitely not what I tested before. N20 was a better match!

I got my makeup done by another lady using the Sephora and Pantone collaboration set focused around the colour of the year, Radiant Orchid. Katina came around and told me I looked like a rose, which was awesome, but I definitely felt a little naked without my brows done. (I didn't do my makeup before going because that would have been a WASTE.) The lipstick for this year definitely seems more pink than radiant orchid, so that was mildly disappointing. In the picture below, I'm wearing a different lipstick that seems to match the theme a lot more... And I filled in my brows. Everything else was done in store!


(Anything marked * was from the SEPHORA+PANTONE UNIVERSE The Face: Radiant Femme Artistry Set.)

BROWS
Anastasia Beverly Hills Beauty Express brow kit in Brunette
Anastasia Beverly Hills Tinted Brow Gel in Granite

EYES
Liquid liner*
Browbone - Liquid luminizer*

FACE
Make Up For Ever HD Micropefecting Primer in 1 Green
Make Up For Ever Liquid Lift Foundation in 1 Porcelain
Make Up For Ever Full Cover Concealer in Pink Porcelain 1
Cream blush*
Sephora Collection bronzer (I don't know what the shades were, sorry!)

LIPS
NYX Butter Lipstick in Hunk (blue violet)

The last station was hair and oh my goodness, let me just say that I waited for a good 15ish minutes because I really wanted my hair done and it was WORTH IT. The three options were a blowout, an evening look (someone said it was a braid of some sort?), and beachy waves and Katina immediately told me BEACHY WAVES with much enthusiasm. The woman doing everyone's hair was phenomenal. She curled my hair in about 10 minutes. Usually it takes me two hours and it wouldn't look half as awesome as it did.


Katina took that picture of my hair right after it was finished. Look at how awesome it looks.

And here's a few pictures of what I bought in store. Erica rang me up and told me that she expected me to do more damage (which I ended up doing online later on in the week...) but I thought I'd try to spread it out.


Pictured are the Urban Decay Electric Palette (OH MY GOD, BRIGHT COLOURS!), two Nest Fragrances rollerballs (Midnight Fleur and Indigo, the latter of which is possibly one of my favourite scents ever--the Nest candle was free with a $50 purchase!), and a Sephora matte eyeshadow in the shade Blueberry Muffin for when I finally decide to do my purple gradient brows.

I did a bit of a look of the day today, as well. It's sort of Game of Thrones-themed because S4 premieres tomorrow and I have something else planned for tomorrow, but I found myself wearing a GoT shirt and went a bit House Arryn.


No tutorial today because the look was basic, haphazard, and not that important, but hopefully I'll be able to write up something great for tomorrow. Also, I took a picture of the shirt but it looked really creepy and a little too propositioning, sooo...

BROWS
Anastasia Beverly Hills Beauty Express brow kit in Brunette
Anastasia Beverly Hills Tinted Brow Gel in Granite

EYES
Too Faced Shadow Insurance
Victorian Disco Cosmetics loose eyeshadow in Sailor Mercury (bright blue with a red sheen and blue sparkles)
Urban Decay 24/7 Glide-On Eye Pencil in Binge (pearly navy blue, discontinued)

FACE
Urban Decay Naked Skin liquid foundation in 1.0
Kat Von D Lock-It Tattoo Concealer in Light 16
Under eyes - It Cosmetics Bye Bye Under Eye concealer in Light

LIPS
NYX Soft Matte Lip Cream in Cannes (matte muted mauve)
Urban Decay Revolution Lipstick in Naked (nude-pink)

24 January 2014

disney villains series - scar

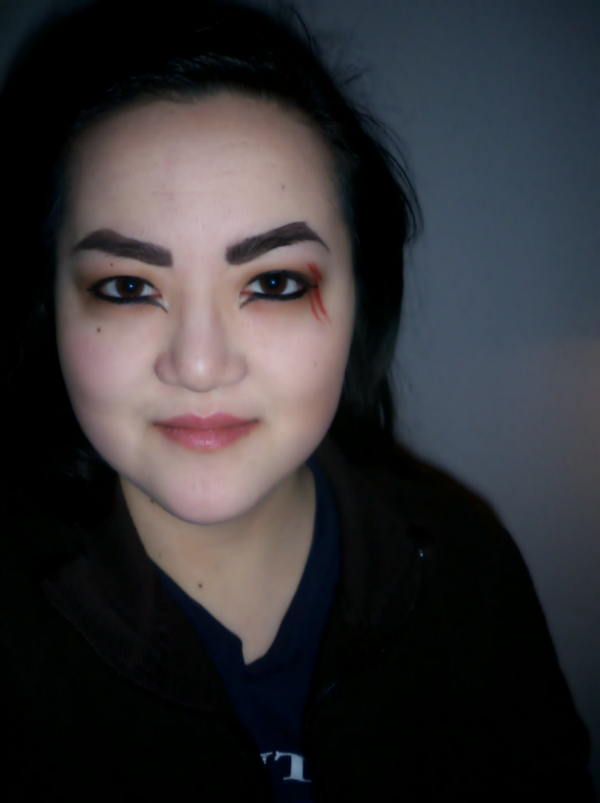
OKAY, so I said I wasn't going to do any makeup looks for a while, but I lied. Just this one until the scratch heals because I just noticed that it's starting to scab. (TMI, maybe?) Katina told me that I should do something with my look for my blog, so here it is! I took to Twitter last night and joked that I looked like Scar from the Lion King.


Lo and behold, a terrible photo of my eye taken in the car earlier today. (No sunlight, just super winds and cloud cover because it's fucking cold in Chicago.) Zero makeup on, whoo!

My younger sister spent at least a good year of her life watching the Lion King three times a day, every single day, and of course I was always there to watch it, too. There's something to be said about how the two of us prefer the anthropomorphic animal Disney films to the princess ones, but they always had the greatest music, okay? And Jeremy Irons is just all around insanely talented.


I asked for opinions on Tumblr on what I should do with my lips, and after taking multiple photos in both nude and black lipstick, I came to the conclusion that no lipstick at all seemed to work best. My natural lip colour is quite pink, but the truer nude lipsticks that I tried on just washed me out and the black lipstick looked hilarious.

Obviously, I emphasised my scratch a lot more and the red gel eyeliner that I have was perfect. I decided to go with red as though the scratch was new because trying to get a pale, slightly puckered scar-like mark would be too difficult given the tools I have. (There's multiple marks because I have spatial issues and couldn't figure out where to draw one connected line. Whoops!) The eyeshadow itself was simple--two different matte browns, the darker one over the lid and the lighter one into the crease and pulled upward toward the brow. I tightlined my upper and lower lashes with a black pencil liner and lined both my upper and lower lash lines with a liquid liner, creating wings in both corners.

My brows look HILARIOUS, but since I have naturally dark brows that are absolute torture to cover up with the gluestick trick, I had to cover all of my brow hair with a dark matte brown-black eyeshadow. Exaggerating the arch of your brow really makes the look seem more villainous.

Scar has a very thin, angular face, which is a common physical attribute of villainous characters, so I tried to make my face a little more angular, too, using contouring beneath my cheekbones, under my jawline, around my forehead and temples, and down the sides of my nose. I'm so pale that the flash tends to wash me out, though, so it's not really as noticeable as I had hoped.


Dat scar.

BROWS
Urban Decay eyeshadow in Crave (deepest, darkest brown/black matte)

EYES
theBalm Put a Lid On It! eyeshadow primer
Lid - theBalm Nude 'Tude eyeshadow in Sleek (dark black-brown matte)
Crease - Urban Decay eyeshadow in Faint (warm, dusty brown matte)
Lower lid - theBalm Nude 'Tude eyeshadow in Sultry (warm medium brown matte/satin)
Waterlines - Urban Decay 24/7 Glide-On Eye Pencil in Perversion (matte blackest black)
Upper lash line + inner corner wing - Sephora Collection Long-Lasting 12HR Wear Eye Liner in 01 Black (matte black)
Inner corner - Urban Decay 24/7 Glide-On Eye Pencil in Yeyo (metallic white)
Scar - Makeup Geek Gel Liner in Poison (matte rusty red)

FACE
Urban Decay Naked Skin liquid foundation in 1.0
Contour - Maybelline Fit Me foundation stick in 235 + Too Faced Milk Chocolate Soleil bronzer
Contour (nose) - Urban Decay eyeshadow in Faint (warm, dusty brown matte)

LIPS
fresh Sugar Lip Treatment SPF 15


Just a close-up of the eyes for you, since nothing else really matters in this look. :]

23 January 2014

look of the day - 70s inspiration/lily evans potter

Another request from my friend Meg! She made a whole bunch, so you'll be seeing her name on a lot of posts. She requested a look for Lily Potter. You know, Harry Potter's mum? She was a teenager in the 70s, so of course I had to draw some inspiration from photos from the 70s.

There was a strong push toward natural looking skin with foundation that matched your skin tone, and everyone wanted to be tan. Obviously, that's not going to happen for me, seeing as I'm naturally ghostly pale. Lips were kept in natural tones, if not frosty shades, and there was light blush on the cheeks. The focus was on the eyes--frosty shadows in shades of blue and green were popular, but so were shades of pink and brown. I used this and this as reference sites.


My hair is looking sloppy, but I had just shaken it up to try to give it some Farrah Fawcett-esque volume. Aside from super flipped-out hair, stick straight hair was also a popular look, so luck was on my side!

Unfortunately you can't really see the light blue eyeshadow that I put on since I didn't bring it up past the crease! Brows were more natural and thin, but mine are full so I just used a brow pencil and brushed that through. I used two different lip glosses to get a nude pink shade that was lighter than my natural lip colour, and I used a gel blush for my cheeks, as well as some liquid highlighter above my cheekbones.

For my eyes, I mixed a medium-dark blue with a very pale blue shade to get a colour that seemed to match more of the reference photos and packed the pigment onto my lids. Using a matte brown eyeshadow, I blended the colour into the creases of my eye sockets. Some liquid eyeliner winged out on top, a white pencil on the lower waterline, and a dark blue eyeliner along my lower lash line rounded off the look!

Obviously this look may not have suited Lily exactly, as she had ginger hair and green eyes, which obviously doesn't match my colouring in the slightest. But I think she would have stuck to natural lip colours and flawless skin with a pop of colour on the lids. Since she had green eyes, maybe she would have worn matching green shadow, or more neutrals since her colouring was so striking, but I think blue eyeshadow, when done right, looks good on everyone.

BROWS
Benefit Instant Brow Pencil in Deep
Anastasia Beverly Hills Tinted Brow Gel in Granite

EYES
theBalm Put a Lid On It! eyeshadow primer
Lid - Fyrinnae loose eyeshadow in Arcane Magic: Mermaid Masquerade (royal blue shimmer with purple/pink shift) + Fyrinnae loose eyeshadow in Otherworld (pale aqua shimmer with turquoise and blue sparkle)
Crease - theBalm Nude 'Tude eyeshadow in Sultry (warm medium brown matte/satin)
Upper lash line - Sephora Collection Long-Lasting 12HR Wear Eye Liner in 01 Black (matte black)
Lower waterline - Urban Decay 24/7 Glide-On Eye Pencil in Yeyo (metallic white)
Lower lash line - Urban Decay 24/7 Glide-On Eye Pencil in Binge (pearly navy blue, discontinued)

FACE
Urban Decay Naked Skin liquid foundation in 1.0
Benefit boi-ing concealer in 01
Under eyes - Benefit Fake Up Concealer in 01 Light
Too Faced Milk Chocolate Soleil Bronzer
Josie Maran Coconut Watercolor Cheek Gelée in Poppy Paradise
Highlight - Benefit high beam (cheekbones) + Benefit moon beam (cupid's bow + bridge of nose)

LIPS
Buxom Full-On Lip Cream in White Russian (nude pink)
Buxom Full-On Lip Polish in Dolly (shimmering muted plum)


I'm going to take a few days off from putting on makeup, at least near my eyes. Luckily, it's not hugely noticeable in these pictures, but I scratched the corner of my left eye this morning. Thankfully, I didn't break skin, but it's red and raw and stings quite a bit, so it's time for me to ease up!

22 January 2014

look of the day - 40s inspiration/minerva mcgonagall

Okay, I know the title of this post says 40s inspiration, which this look really is, but the original request came from my dear friend Meg, who said:

i politely request a young, hot mcgonagall look. for science.

SO. I had to comply because let's face it, McGonagall's history is fantastic. If any of you are on Pottermore, you've probably read what J.K. Rowling posted about her family and background. She was born in 1935, which means that she was leaving Hogwarts sometime in the 50s. I've done a few retro/50s inspired looks already, but I think McGonagall, if she even bothered with makeup, would have been a little outdated with her look, though it would still be classic. So I chose to go with the 40s, using this site as inspiration.

The 40s had a very clean look, with natural, groomed brows, a clean face, and minimal eye makeup. The focus was entirely on the lips. The 40s were all about lipstick, especially red lips. I'm of the impression that McGonagall probably didn't care too much for lipstick, but hey, a girl can dream!


I don't have a close-up for you all today, unfortunately, but that's because the eye makeup is very, very minimal. I used all matte eyeshadows--a skin-toned shade all over the lid, and a slightly deeper shade in the outer corner and crease just for a bit of definition. I tightlined my lashes with a black eyeliner and lined my upper lid with a brown pencil liner, and then I curled my lashes and put on a few coats of mascara.

Put on some foundation or anything with light to medium coverage and conceal what needs to be concealed. Use a pink-y blush on the cheeks and bring the colour up along the cheekbones. Contouring is totally optional, but I always think it adds something nice to the overall look, especially since I'm so used to having a super round face. (Which is changing seeing as I've lost over 20 pounds since August...)

THE LIPS! Okay, so all I did was put on some red lipstick and blot it a few times with a tissue to take off the shine and some of the colour. Even though the 40s were all about strong red shades, I think McGonagall wouldn't have wanted something that was too dramatic. I've also read that women were changing their lip shape with their lipstick to make their mouths appear fuller, but I always feel a little clownish doing it. But if you're comfortable with it, then go for it. Never let anyone else dictate how you do your makeup! Makeup should make you feel good about yourself, so don't listen to haters.

Also, maybe one day I'll dress up for pictures, but today is not that day. And it will likely not be that day until I can overhaul my closet for clothing that both physically fits me and matches my personal style. We'll see!

BROWS
Benefit Instant Brow Pencil in Deep
Anastasia Beverly Hills Tinted Brow Gel in Granite

EYES
theBalm Put a Lid On It! eyeshadow primer
Lid - Urban Decay eyeshadow in Foxy (very light yellow/white matte)
Outer corner + crease - Urban Decay eyeshadow in Faint (warm, dusty brown matte)
Brow bone - Saucebox Cosmetics Creme de la Creme palette (lightest off-white shimmer shade)
Upper lash line - Sephora Nano Eyeliner in 05 Chocolate
Waterline - Urban Decay 24/7 Glide-On Eye Pencil in Zero (black)
Mascara - Maybelline Volum' Express the Mega Plush mascara in Blackest Black

FACE
Urban Decay Naked Skin liquid foundation in 1.0
Benefit boi-ing concealer in 01
Under eyes - It Cosmetics Bye Bye Under Eye concealer in Light
Contour (cheeks) - NYX Powder Blush in Taupe (matte taupe)
Contour (nose) - Urban Decay eyeshadow in Naked2 (taupe matte)
bareMinerals blush in t.t.y.l. (sheer poppy pink)

LIPS
Maybelline Color Sensational lipstick in 645 Red Revival

20 January 2014

look of the day - inspired by elsa from disney's frozen

I barely slept last night and I really wanted to take a nap, but before I knew it, it was past 3PM and I figured I would do my makeup instead!

For those of you living in a cave, Frozen is Disney's latest animated feature. There are a lot of issues that should be addressed, but since this is a makeup blog, let's focus on the makeup... Elsa's, to be exact, during Let It Go. I've only seen the movie once at my sister's insistence, but the makeup stuck with me. (Big surprise, no?) Now, I distinctly remember the lip colour in the film being more cranberry than neutral pink, but this picture says otherwise. To compromise, I did both.


HAIR, STOP DOING WHAT YOU'RE DOING. I really did want to do a braid, but my hair really hates staying in braids and I didn't want to bother putting any product in. Elsa's got some awesome eyelashes, so I had to make do with falsies that seem to cover up my entire lid when my eyes are open. I had to change the look a little, as I don't have round Disney eyes, so the shape of her eyeshadow wouldn't have worked on me. I always apply eyeshadow with my fingers because my brushes tend to muddle colours together, but that might just mean I should use the better quality brushes I have. Whoops!

Start with a silver cream eyeshadow in the inner corner of your eye and then pat a loose silver shadow over that. Next, press a lavender shadow into the center of your lid. Brush a darker purple shadow into the outer corner. I used three different purple eyeshadows to get the gradient effect, but you should be able to get away with two. I just like making things more complicated than they need to be! Aim for purples that don't lean too blue or too red, but somewhere in between.

Take a deep pinkish purple and brush that into the crease. Blend all of the colours together well--use a brush for this! Using a deep purple shade, line your lower lash line. Take a black eyeliner and line your upper and lower waterlines and your upper lash line.

Falsie time! Obviously you can skip this step. I always have a lot of trouble with false eyelashes, but I suffer through them for performances and photos. I forgot to curl/put on mascara on my natural lashes, but they're so insubstantial compared to the falsies that it wouldn't have made a difference!

Using a light pink blush (or loose eyeshadow, in my case), swirl colour into your cheeks and along your cheekbones. I tapped and blended a pale liquid highlighter just above the cheekbones, too. Elsa doesn't have a contoured face, as that's more typical of Disney villains and not the princesses, so there's no need for adding shadows to your face.

Here's a close-up of the look with the pink gloss.


That blue scarf is the only accessory/item of clothing that I have that's remotely close to the colour of Elsa's dress. That will hopefully change, as I love pretty much any shade of blue, but my closet is currently in need of a serious overhaul.

The cranberry lip was more difficult to achieve. I started off with a lip cream form NYX, but I thought the colour appeared too light, so I added a layer of a lipstick from Rimmel. That seemed to make the colour more opaque, but after adding Clinique's cult classic Black Honey, I thought the colour was perfect.


BROWS
Anastasia Beverly Hills Beauty Express brow kit in Brunette
Anastasia Beverly Hills Tinted Brow Gel in Granite

EYES
theBalm Put a Lid On It! eyeshadow primer
Inner corner - Maybelline Color Tattoo Metal 24HR Cream Gel Shadow in 60 Silver Strike + Fyrinnae loose eyeshadow in Dinosaur Plushie (pale metallic silver with multi-colored sparkle)
Center of lid - Sugarpill Chromalust pigment in Paperdoll (lavender shimmer)
Outer 2/3 of lid - Sugarpill Chromalust pigment in Hysteric (metallic purple with turquoise shimmer)
Outer corner - Fyrinnae loose eyeshadow in Arcane Magic: Mystical Hedgehog (purple shimmer with turquoise-green highlight and pink shift)
Crease - L'oreal Infallible 24 HR Eye Shadow in 557 Glistening Garnet + Fyrinnae loose eyeshadow in Meerkat (pink-purple with gold shimmer)
Liner - Urban Decay 24/7 Glide-On Eye Pencil in Perversion (matte blackest black)
Lower lash line - Saucebox Cosmetics Forbidden Fruits palette (matte deep purple shade)
False lashes - Sephora False Eye Lashes in Mink

FACE
Urban Decay Naked Skin liquid foundation in 1.0
Amazing Cosmetics Amazing Concealer in Light Golden
It Cosmetics Bye Bye Under Eye concealer in Light
Blush - Sugarpill Chromalust pigment in Birthday Girl (princess pink with fuchsia sparkles)
Highlight - Benefit high beam

LIPS
NARS Velvet Gloss Lip Pencil in New Lover
OR
NYX Soft Matte Lip Cream in Monte Carlo + Rimmel London Lasting Finish Matte by Kate Moss lipstick in 107 + Clinique Almost Lipstick in Black Honey


15 January 2014

hogwarts series - slytherin (everyday)

Today was pretty damn cold, so I think my fingers nearly froze off whilst driving around town. I'm currently rocking third-day hair and all I want to do is sleep for days, but alas, I forced myself to finish this final house look. I spent about an hour total coming up with this look, although I didn't know how to incorporate the green at first. I was lying in bed re-reading A Great and Terrible Beauty and it hit me--it need to go in the crease.


And again, forgive me for the laziness of my hair! It's kind of all over the place, but I did pin it back behind my ears to give it a semblance of effort. For some reason, you can't even see the bottom part of my hair in this picture... Womp. Anyway, this look was focused on the green eyeshadow in the crease blended up toward the eyebrows and the silver eyeliner on both the upper and lower lids. I used a shimmery white eyeshadow on the entire lid as a transition between the eyeliner and the green. The white doesn't translate well in photographs, though, possibly because I'm so pale that the flash just made it look like the rest of my skin. It does show in person, though!

The rest of the face was simple--foundation and concealer for coverage, a bit of highlighter on the cheekbones for a subtle glow, and a deep berry lip/cheek stain applied lightly for blush. The same stain is patted onto the lips several times to build the colour.

BROWS
Anastasia Beverly Hills Beauty Express brow kit in Brunette
Anastasia Beverly Hills Tinted Brow Gel in Granite

EYES
Lid - Beauty From the Earth Cosmetics loose eyeshadow in Glistening (creamy white with multi-coloured sparkles)
Crease - Sephora eyeshadow in N° 7 Picnic in the Park (grass green shimmer)
Liner - NYX Slide On Liner in Platinum (silver)
Waterlines - Urban Decay 24/7 Glide-On Eye Pencil in Perversion (matte blackest black)
Lashes - Maybelline Volum' Express the Mega Plush mascara in Blackest Black

FACE
Urban Decay Naked Skin liquid foundation in 1.0
Benefit boi-ing concealer in 01
Under eyes - Benefit Fake Up Concealer in 01 Light
Highlight - rms beauty living luminizer
rms beauty lip2cheek in diabolique (dark burgundy)

LIPS
rms beauty lip2cheek in diabolique (dark burgundy)


10 January 2014

hogwarts series - hufflepuff (everyday)

It's been an interesting couple of days here, what with the weather being so drastically different today than even Monday's weather. It went from subzero temperatures to snow to 40 degrees F and rain. It's still raining, in fact, and has been doing so for hours. It ruined my plans for the afternoon, but that's why I have something to post for my wonderful readers.

I recently watched this video by Kat Von D and I absolutely fell in love with the idea of it. Now, I got lazy and didn't want to use a makeup wipe to get the little triangle cut-outs in my eyeliner, so the result is that it looks quite sloppy, but for the first time trying it, I thought it went surprisingly well! I'm not one for a thick wing, but I think it's edgy without being overwhelming, especially since this doesn't need any eyeshadow to accompany it.


I'm really hating that my glasses are naturally crooked on my ears and nose, ugh. But yes, you can almost see the eyeliner in this picture, but the salient point is that this look is very natural in every other aspect of the face. Focus on the eyeliner, but make sure to even out your skin with something simple like a BB cream or a tinted moisturiser. I used a stick foundation, but it was quick and easy. Make sure to use some blush! Rosy cheeks are very Hufflepuff in my mind.

It's not painfully obvious in these photos that there's any yellow in this look, but I did use some bright yellow eyeshadow right next to the eyeliner wing. It's subtle, but that way it doesn't compete with anything.

For some reason, I've been very into braiding my bangs into a headband around my face when I'm rocking second-day hair. Part of it is because I hate dealing with greasy bangs, but I also really hate pinning them back because bobby pins and I don't get along.

BROWS
Anastasia Beverly Hills Tinted Brow Gel in Granite

EYES
Liner - Sephora Collection Long-Lasting 12HR Wear Eye Liner in 01 Black (matte black)
Waterlines - Urban Decay 24/7 Glide-On Eye Pencil in Perversion (matte blackest black)
Decoration - Saucebox Cosmetics Temptation palette (yellow shade next to eyeliner wing)

FACE
Maybelline Fit Me foundation stick in 110
Benefit boi-ing concealer in 01
Under eyes - Benefit Fake Up Concealer in 01 Light
L'Oréal Paris Magic Smooth Soufflé Blush in Celestial (muted rosy pink)

LIPS
Smashbox O-Gloss Gold


06 January 2014

hogwarts series - hufflepuff (dramatic)

I live in the Midwest, so today we got hit by that polar vortex and the high for today was -10°F with a wind chill 25 degrees below that. Our furnace stopped working for a solid hour and I couldn't feel my fingers and toes indoors, but my dad found the issue and all was well! Since I knew today was going to be super cold, I decided today I needed to do the Hufflepuff look because I had plans to curl my hair.

Curling my hair is a full on production. Because I have very thick hair and it's a bit longer than I've had it in four years, it usually takes upwards of two hours for me to get all of my hair. I have to make the sections for each curl smaller since my hair is so thick--luckily, I was using a larger barrel. I think it was a 1 1/4" barrel, but I have cheap curling irons so I don't really know. I burnt my ear once and my fingers three or four times and had to enlist my sister's help for the very back of my head, but I managed to finish my whole head in 1.5 hours! I had everything pinned for too long so my hair was massive, but now it's finally settling down.


This photo is a little blurry, but the look itself is actually quite simple. I used some foundation and a bit of highlighting/contouring to make it seem like I have cheekbones to some degree. Concealer was an absolute must, as the redness would have been very obvious given the way I did my makeup.

I nearly forgot to fill in my brows for these photos. Originally, I wanted to use a matte charcoal eyeshadow for them, but I thought it might be too severe and too in competition with the eyes.


The key here is the eyeliner. I put on a white base for the yellow eyeshadow so the colour seemed more vibrant. All you need to do is pat colour on the lid up past the crease. I used a pencil eyeliner to line my upper and lower waterline in order to thicken the appearance of my lashes. Finally, I used a liquid eyeliner to create a basic cat-eye shape before I took the brush across the lid and under the eye, too. Go crazy with the shape! Don't get too artistic on one eye before you start on the second one--you want to keep it even, so trace a little on the left eye, then the right eye, and switch back and forth.

To round off the look, use a bit of blush and a nude lip colour.


BROWS
Benefit Instant Brow Pencil in Deep
Anastasia Beverly Hills Tinted Brow Gel in Granite

EYES
theBalm Put a Lid On It! eyeshadow primer
Lid - NYX Jumbo Eye Pencil in Milk (white) + Sugarpill pressed eyeshadow in Buttercupcake (bright matte yellow)
Liner - Sephora Collection Long-Lasting 12HR Wear Eye Liner in 01 Black (matte black)
Waterlines - Urban Decay 24/7 Glide-On Eye Pencil in Perversion (matte blackest black)
Lashes - Maybelline Volum' Express the Mega Plush mascara in Blackest Black

FACE
Urban Decay Naked Skin liquid foundation in 1.0
Benefit boi-ing concealer in 01
Contour - Maybelline Fit Me foundation stick in 235
Highlight - Benefit high beam
Under eyes - Benefit Fake Up Concealer in 01 Light
L'Oréal Paris Magic Smooth Soufflé Blush in Celestial (muted rosy pink)

LIPS
Obsessive Compulsive Cosmetics Lip Tar in Interlace (palest crème peach)


06 November 2013

look of the day - new haircut!

I definitely meant to post this on Monday when I actually went in to get a haircut, but lo and behold, I've been lazy and kept forgetting to upload the pictures to my computer. I haven't had a haircut in 8 months, not counting the haphazard trim I did just to get rid of some split ends, but it was high time.


Don't I look like a happy camper? Forgive me for how tired I look... It's difficult having someone cut your hair and try to initiate small talk in Mandarin when you can't really understand his accent normally, let alone with a hair dryer blowing in your face. The length is more or less the same (I think he said he only snipped off a centimeter from the bottom of it) but he cut more layers into it and my bangs are finally bangs again.

Since I have bangs that end just at eye level, I can get away with not wearing as much eye makeup but you know me, I like doing up my eyes a lot more than my lips. But since Monday was a bit of a lazy day after the cut and I was trying to shake out all the bits of hair from my clothing, so I just did a simple lip-focused look.

BROWS
Sephora Brow Sculpting Pencil in Dark
Anastasia Beverly Hills Tinted Brow Gel in Granite

EYES
Lashes - Maybelline Volum' Express the Mega Plush mascara in Blackest Black

FACE
Urban Decay Naked Skin liquid foundation in 1.0
Benefit boi-ing concealer in 01 Light
Benefit Fake Up Concealer in 01 Light

LIPS
NYX Slim Lip Liner in Plum
Revlon Colorstay Ultimate Liquid Lipstick in Brilliant Bordeaux

31 October 2013

halloween looks - wednesday addams

As Halloween comes to a close, I thought I'd share my Halloween costume! It was quick and easy and I ended up not even leaving the house after I put it on, but it was worth the fuss. I'm not actually a huge fan of most Halloween decorations because I'm really easily startled and I get nightmares from more or less everything, but this year I suddenly became fascinated with special effects makeup so I might end up taking makeup classes to work toward getting a professional license.


The best part of this costume? No need to cover any undereye circles. I seriously never realised how frustrating they were until this year. One benefit of wearing glasses for almost my entire life, I suppose! The clothing was just picked out of my closet: an old dress shirt from what must have been middle school, a black long-sleeved shirt, a skirt from Forever 21 that I bought ages ago, and some black tights.


BROWS
Sephora Brow Sculpting Pencil in Dark
Anastasia Beverly Hills Tinted Brow Gel in Granite

EYES
Lid - Urban Decay 24/7 Glide-On Eye Pencil in Perversion (matte blackest black) + Urban Decay eyeshadow in Faint (warm, dusty brown matte)
Lash lines - Urban Decay 24/7 Glide-On Eye Pencil in Perversion (matte blackest black)
Under eyes - Too Faced eyeshadow in Like a Virgin (taupe-grey matte) + Sigma Crème de Couture blush in Blackberry Essence (amethyst berry mist) and Strawberry Ambrosia (cotton candy)
Lashes - Maybelline Volum' Express the Mega Plush mascara in Blackest Black

FACE
Urban Decay Naked Skin liquid foundation in 1.0
Benefit boi-ing concealer in 01 light
Benefit Fake Up concealer in 01 Light

LIPS
Maybelline Color Sensational lipstick in Deepest Cherry (deepened dark plum berry)


And with Halloween coming to a close, it's time for me to work on my NaNoWriMo novel! Of course, as usual, I have no idea what I'm doing and there's only a half hour left before November, so like last year I'll be winging it. This might mean less frequent posts to this blog, but let's face it... I'm a chronic procrastinator so I'll want to do this and not write at some point.

27 October 2013

halloween looks - broken doll tutorial

Wow, it's been a week since my last post. I've been lacking in inspiration and focus as of late, but I just discovered a desire to try special effects makeup and I went full out with recreating my look from last Halloween.

Ta-da! This was my last-minute costume that I wore to my a cappella group's rehearsal. I had my hair in tight ringlets and only managed to curl about 2/3s of my hair before we had to go and I was already late... And it still took me two hours to do the hair alone. I wore a dress I bought at Hot Topic, ripped nylons, and round-toed black heels. I think it worked well for something I slapped together.

There are a few changes I made this time around: I filled in my eyebrows to mimic a more rounded shape, I didn't bother curling my hair with a 1/2" iron, and I chose a lighter lip colour.

Pre-broken doll...

My hair takes too long to curl regardless of what I do to it, but I think this was worth it. If you want to try this for Halloween, you don't even need to curl your hair! You can just put your hair into pigtails of your choice, but I was going for a very made up doll look. The tutorial follows the next picture and if anyone needs a detailed description and/or photo for a particular step, please don't hesitate to ask.


  1. Prime your face. I'm using Embryolisse Lait-Creme Concentre because it's wonderful and my skin needs the extra moisture, but you can use a normal foundation primer if you'd prefer. (If you want to go all out and use circle contacts, put those in now before you start your makeup!)
  2. Using a foundation brush, cover your face with a foundation that is one shade lighter than your skin tone. You can forgo the lighter foundation if you don't have it, of course, but they don't call them porcelain dolls for nothing.
  3. Conceal as needed. I have a lot of redness in my cheeks, so I focused on that and on the dark spots around my face. Dolls have completely flawless skin, so aim for that. You can also use a full-coverage foundation so you don't need to do as much concealing!
  4. After applying eye primer, use a matte shadow that is close to the colour of your skin on each eyelid. You don't need to be precise with this--it's mostly to help the rest of the eyeshadow blend more easily. (Here's the fun part: you don't need to stick to the eyeshadow look I've done here! As long as you keep it simple, anything goes. If you want to use a light blue eyeshadow, go for it. Use a green, if you'd prefer!)
  5. Using a matte shadow that is a few shades darker than your skintone, work the colour into the crease of your eye. Make sure to blend blend blend! When you're done with this, use the same shade and contour slightly around your nose. You want to connect the inner corner of your brow to your nose and then draw a straight line down, and then shade the tip of your nose to get the dainty doll look. Make sure to blend out all the harsh lines. (I forgot to do this here, but you can also brush the shadow below your bottom lip to make your lips appear fuller. Add a little white pencil on your cupid's bow, too!)
  6. Take a matte black shadow and work that into the crease over the nude shadow. This is mainly to provide definition that will emphasise the doll lashes you'll be putting on later.
  7. Fill in your eyebrows! Mine are naturally thick so I didn't want to work against that. Dolls tend to have thin eyebrows so if you have thin brows or your brows are light, try playing around with changing the shape of your brows! Aim for a soft, rounded shape with no discernible arch.
  8. Line the waterline and just under your eye with a white pencil. You're shooting for big eyes, and this will work in your favour.
  9. Line your upper lash line with a black pencil. This will give you a place to hide the false lashes.
  10. Draw a dashed line with your black pencil below where you've used the white pencil on your lower lash line.
  11. Curl your lashes and add a coat or two of mascara. Now for the fun part: glue on those falsies! Thickness is not what you're aiming for--you want a pair of long, fluttery lashes.
  12. Using a red blush or shadow, go wild with colour on your cheeks. I used an eyeshadow with a sightly heavy hand. Focus the colour on the apples of your cheek and don't be afraid to make the colour bold.
  13. Take a taupe or brown pencil and dot some fake freckles on over the cheeks and the bridge of your nose. You don't want these to look too perfectly spaced, but aim for clean dots.
  14. Take a pink lipstick (or lip product of your choice) and fill in your lips. Don't be afraid to exaggerate the look and work out of your lip line! Dolls have naturally pouty lips so you can focus on the bottom lip and not apply anything at the corners of your mouth. If you have very pigmented lips, you might want to put a little concealer into the corners with a concealer brush.
  15. Place a bit of a light pink gloss on the center of your bottom lip.
  16. Time to make yourself as creepy as possible! Take a sharp black pencil and lightly begin to trace where you want the cracks and chips to go. Don't make these lines too harsh at first and don't think too hard about what you're doing with the lines. Make them haphazard! You can outline large pieces that will be missing.
  17. Fill in the large broken pieces. Use the pencil with a heavy hand to fill in the outlines to make them appear more multi-dimensional.
  18. If you're going out, you can possibly set your face with a translucent powder. However, the black pencil might prove difficult. Test it before you go out, and if that doesn't work, a setting spray will help tremendously.
  19. Keep reminding yourself not to touch your face. If you look at the first photo in this post, you can see that the eyeliner kept smudging because I have that bad habit of touching my face constantly. I'd also advise not to put a big missing chunk on your nose because that's likely where you're smudge things first.


BROWS
Sephora Brow Sculpting Pencil in Dark
Anastasia Beverly Hills Tinted Brow Gel in Granite

EYES
Lid - Urban Decay eyeshadow in Foxy (very light yellow/white matte)
Crease - Urban Decay eyeshadow in Naked2 (taupe matte), Faint (warm, dusty brown matte) + Crave (deepest, darkest brown/black matte)
Upper lash line - Urban Decay 24/7 Glide-On Eye Pencil in Zero (black)
Lower lash line - Urban Decay 24/7 Glide-On Eye Pencil in Yeyo (metallic white) and Zero (black)
Lashes - Maybelline Volum' Express the Mega Plush mascara in Blackest Black
False lashes - Ardell lashes in #105 Black

FACE
Marc Jacobs Gel Genius Foundation in 10 Ivory Light
On cheeks - MAKE UP FOR EVER Full Cover Concealer in Pink Porcelain 1
Benefit Fake Up concealer in 01 Light
Under eyes - Maybelline Fit Me Concealer in 15 Fair
Blush - Sugarpill pressed eyeshadow in @#$%! (vampy pearl red with silver metallic sheen)
Fake freckles - Urban Decay 24/7 Glide-On Eye Pencil in Desperation (deep taupe to gray matte)
Broken patches - wet n wild coloricon eyeliner in black

LIPS
NYX Soft matte Lip Cream in Sao Paulo (plummy-pink)
NYX Butter Gloss in Merengue (pink lilac)


My mom told me that I'm creepy. I think that means this is a success.