Showing posts with label bareminerals. Show all posts

17 May 2014

orphan black clones series #4 - cosima niehaus

Wow, it's been a while, hasn't it?

I have excuses that you don't care to hear for all of it, but I do have to say that I did this look before a graduation party I'm going to shortly and holy hell does it take a long time to try to finagle my hair into "dreads". And by dreads, I mean I did a few crappy twists around the top of my head and gathered the rest of my hair into a ponytail because my hair is impervious to styling unless I fry it.

Cosima has the coolest look, in my opinion, although my personal look leans more toward Sarah. (You'll see that once I link my post-Cosima makeover picture.) Obviously I don't have dreadlocks, but her eyeliner is amazing.


The dumb thing is that you can't even see my hair! Well, Cosima's makeup is actually rather straightforward. Take a liquid liner (black is the most common, of course, but if you have a navy liner, that's what the makeup artists on the show use!) and line your upper and lower lash lines. Then extend the line on the upper lid outward to create a wing, and extend the line on the lower lid toward your nose. Now, I know that for Cosima's makeup, the eyeliner on both lids is connected in both the outer and inner corners, but since my eyelids are hooded everywhere except the inner corner, where they're more monolid-like, I didn't connect the inner corners. If you don't have this issue, you can connect the lines easily.

I used a black liquid liner, so after the shape was created, I used a navy pencil liner and a thin liner brush to outline the shape and give it the correct colour. It doesn't seem like Cosima wears much other makeup, but I did use a bit of a nude lip colour to lighten up my natural lip colour. (I put on a layer of a light OCC lip tar and then dabbed on a nude/mauve Bite lipstick over that.)

BROWS
Anastasia Beverly Hills Beauty Express brow kit in Brunette
Anastasia Beverly Hills Tinted Brow Gel in Granite

EYES
Too Faced Shadow Insurance
bareMinerals mineral veil
Liner - Sephora Collection Long-Lasting 12HR Wear Eye Liner in 01 Black (matte black) + Urban Decay 24/7 Glide-On Eye Pencil in Binge (pearly navy blue, discontinued)

FACE
Missha Perfect Cover BB Cream in No. 13 Bright Beige
Benefit boi-ing concealer in 01

LIPS
Obsessive Compulsive Cosmetics Lip Tar in Interlace (palest crème peach)
Bite Beauty Lipstick in Pepper (dusty rose)


After I took my hair down and changed (and put a tiny Dutch braid where my part normally is), this is what happened. I went from Cosima to Sarah-as-Cosima!

13 April 2014

look of the day - purple wedding

IT'S A LOVELY DAY FOR A PURPLE WEDDING.

I'm going to try not to spoil anyone who hasn't read the A Song of Ice and Fire series, but I'm just saying that I'm so excited for tonight's episode of Game of Thrones that I had to base a look on it. And I might be on the verge of throwing up because I'm so excited.


The brows were done like the ones in this previous look. For the eyes, all you need to do is take a shimmery purple eyeshadow and apply that to the inner half of your lid and then take a shimmery charcoal shadow to the outer half. I was finicky and had to use two different purple eyeshadows and a shimmery white eyeshadow in the inner corner. All eyeshadows were Sugarpill because they're fabulous.

Using the purple eyeshadow, trace your lower lash line. Then take a black eyeliner and line your upper and lower waterlines. You don't want to go too overboard with the eyeliner because you're already wearing a smoky eye with a dramatic lip, but of course, if you want to forego the purple lipstick, feel free to line your eyes a little more heavily.

Excluding the usual foundation/concealer routine (I tried Wayne Goss' tip about putting powder on before foundation), all I used on my face was a foundation a few shades darker than my skin tone for contour and a touch of blush on my cheeks.

Because the lips are so dramatic and vibrant, it's probably a good idea to wear lip liner if you plan to wear it out. I left that step out, but since purple liners aren't that openly available, a clear lip liner would be great. (I prefer cruelty-free brands, but if you don't mind that as much, MAC has some purple liners. NYX is a good cruelty-free option that is also easy on the wallet! I know there are a bunch of other brands out there, too, but I'm forgetting them all.)

BROWS
Inner corner - Laura Mercier eyeshadow in Plum Smoke (matte smoky amethyst)
Inner brow - Sephora eyeshadow in Blueberry Muffin No 30 (black plum matte)
Outer brow - Anastasia Beverly Hills Brow Powder Duo in Brunette (darker shade)

EYES
Too Faced Shadow Insurance
Inner corner - Sugarpill pressed eyeshadow in Diamond Eyes (satin white with crystalline sheen)
Inner lid - Sugarpill Chromalust pigment in Weekender (metallic blue-violet)
Center of lid + lower lash line - Sugarpill pressed eyeshadow in Elemental Chaos (deep grape shimmer with iridescent blue undertones)
Outer corner - Sugarpill pressed eyeshadow in Soot & Stars (metallic gunmetal with prismatic sparkle)
Waterlines - Urban Decay 24/7 Glide-On Eye Pencil in Perversion (matte blackest black)

FACE
bareMinerals Prime Time foundation primer
bareMinerals mineral veil
Urban Decay Naked Skin liquid foundation in 1.0
It Cosmetics Bye Bye Under Eye concealer in Light
Maybelline Fit Me Concealer in 15 Fair
Contour - Maybelline Fit Me foundation stick in 235
Too Faced Sweethearts Perfect Flush Blush in Candy Glow

LIPS
Revlon Colorburst Matte Balm in 215 Shameless
Corners of lips - NYX Cosmetics Soft Matte Lip Cream in Transylvania (matte deep violet)


WHO ELSE IS EXCITED?! Please come talk to me if you've read the books and are super pumped like I am!

12 April 2014

orphan black clones series #1 - sarah manning

Hello, hello!

Today has been surprisingly warm and sunny and spring-like, but next week it's supposed to fall back into the 40s and 50s with rain, womp. Since the weather was "nice" (and this is in quotations because if you know me well enough, you'll know that I prefer colder weather with zero sunlight since I'm a vampire), I went for a walk at the arboretum and then went to an outdoor mall to window shop.

So, Orphan Black.

Next week is the season 2 premiere (and it also happens to be my 23rd birthday!) and to celebrate, I thought I'd start a series based on the clones that we've gotten to know. I only started watching this show at the end of March, though I'd been intending to watch it since shortly after the first season premiered. I'm OBSESSED. I cannot get over this show or how amazing it is and I've been rewatching episodes like it's my job. No spoilers, but I will encourage EVERYONE to watch it.


This is based off of Sarah's look in the first episode, when she's Sarah as her punk self and not as Beth.


(Also, yes, I'm wearing a leather jacket and a black shirt that looks a bit like leather. I also happen to be wearing pajama pants in these pictures, but that would ruin the illusion.)

I probably could have gone with another side braid on the left half of my hair so it wasn't so awkwardly poofy, but hey, I couldn't be bothered and my hair is naturally parted to the side so I needed my hair to stay put. My hair was already sort of wavy after sleeping in braids last night, so that worked for me. Here, have a close-up of the clip-in on my right side!


I didn't make that wavy by braiding it, unfortunately, so it's a little off-putting with how stick-straight it is.

The eyes are very similar to one of my concert looks; take black eyeliner and rim the waterlines and lashlines of your eyes, then thickly line them before smudging the crap out of the liner. Then, top it off with some charcoal shadow. Since my makeup is fresh, it's darker and more pronounced than what Sarah seems to prefer, which is a smoky eye that looks more lived in. For this sort of effect, you can try smudging out the liner with something like an eye gloss or a thick balm-like product--Lisa Eldridge has a great video here.

Nothing on the cheeks unless you feel bare without it. Sarah doesn't strike me as the sort to wear blusher, but I probably could have done with some since I look like a ghost. Whoops!

For the lips, it sort of looks like Sarah cancelled out the colour of her lips with a layer of foundation over her mouth. Most people can't pull this off, myself very much included. I would look like a serious ghost. Instead, take the lightest nude lip colour with which you are comfortable and layer that on your mouth. A good trick to pulling off a true nude lip is to take a pinker shade and dab it right along where your lips meet so you don't look completely zombie-tastic.

BROWS
Anastasia Beverly Hills Beauty Express brow kit in Brunette
Anastasia Beverly Hills Tinted Brow Gel in Granite

EYES
Too Faced Shadow Insurance
bareMinerals loose eyeshadow in k.i.t. (matte medium charcoal grey)
Waterline + lashline - Urban Decay 24/7 Glide-On Eye Pencil in Perversion (matte blackest black)
Liner - Urban Decay 24/7 Velvet Glide-On Eye Pencil in Black Velvet (rich, smoky matte black)
Lashes - Maybelline Volum' Express the Mega Plush mascara in Blackest Black + Maybelline Volum' Express One-by-One waterproof mascara in Blackest Black

FACE
Urban Decay Naked Skin liquid foundation in 1.0
Kat Von D Lock-It Tattoo Concealer in Light 16

LIPS
NYX Soft Matte Lip Cream in Cairo (matte pure nude)
Center of mouth - NYX Soft Matte Lip Cream in Abu Dhabi (deep rose-beige)


06 April 2014

look of the day - game of thrones!!!

GAME OF THRONES IS TONIGHT AND I CAN'T HANDLE MY EMOTIONS.

(I also went to see Captain America: The Winter Soldier this afternoon, so basically I'm a mess of fandom feelings.)

Confession: I don't really care for Daenerys Targaryen. She doesn't interest me in the slightest when compared with the other characters or the unexplored members of House Targaryen. There's an interesting history that goes back for centuries, but I'd rather invest myself in the likes of Sansa Stark.

And if you don't like Sansa Stark, we need to have a serious conversation.

Despite my general apathy/mild dislike for Daenerys, the Targaryen colours are the most violently contrasting, at least for the great houses of Westeros and since I got a shirt from Akira, I wanted to go with the Fire and Blood theme.


DUMB GLASSES ARE ALWAYS CROOKED. Obviously, this is not a look for the faint of heart. Also, I went a little overboard--a shirt with scales, Targaryen makeup, and a dragon earcuff, but hey, what's life without living in a little excess from time to time?

(I was totally going to do braids, but since this was rushed already, I nixed that idea.)


I love this earcuff, but it's really tough to get it on my ear. I managed to snap the post right off within ten minutes of having it home and luckily my dad managed to super-glue it back on, but I'm a little wary of trying to adjust the cuff part because of that.


Also, can we talk about this shirt? This is the weirdest angle and it makes my chest look weird, but I'm in love. Yes, it's a turtleneck so it looks a little strange in selfies and yes, it's a wee bit tight in the neck. But I don't care because it's wonderful.

I'm not going to go into great detail for this look unless someone has a serious hankering to try this, but I will say that the red-black ombre brows are totally fun, and I used black eyeliner to etch out the shape of the black eyeshadow on the outer lid. There aren't any close-ups because this look was actually sort of slapped together since I was rushing trying to finish it and eat dinner before going for a walk, but if anyone wants to see a look where there's a defined line between two colours on the lid, I'd be glad to do something and take the time to do it!

The red eyeliner, by the way? Still in love with it. It was also in my Scar look--I drew three curved lines in homage to the Targaryen dragon but I only did it on one eye.

BROWS
Sugarpill pressed eyeshadow in Love+ (bright red with semi-pearl sheen) and Bulletproof (deep matte black)

EYES
Too Faced Shadow Insurance
bareMinerals mineral veil
Sugarpill pressed eyeshadow in @#$%! (vampy pearl red with silver metallic sheen)
Victorian Disco Cosmetics loose eyeshadow in Lightspeed (deep black with strong silver sparkle)
Urban Decay 24/7 Glide-On Eye Pencil in Zero (black)
Liner - Urban Decay 24/7 Glide-On Eye Pencil in Perversion (matte blackest black)
Makeup Geek Gel Liner in Poison (matte rusty red)

FACE
Urban Decay Naked Skin liquid foundation in 1.0
Benefit boi-ing concealer in 01

LIPS
Urban Decay Revolution Lipstick in F-Bomb (classic red)


WHO ELSE IS READY FOR SEASON FOUR?!

22 January 2014

look of the day - 40s inspiration/minerva mcgonagall

Okay, I know the title of this post says 40s inspiration, which this look really is, but the original request came from my dear friend Meg, who said:

i politely request a young, hot mcgonagall look. for science.

SO. I had to comply because let's face it, McGonagall's history is fantastic. If any of you are on Pottermore, you've probably read what J.K. Rowling posted about her family and background. She was born in 1935, which means that she was leaving Hogwarts sometime in the 50s. I've done a few retro/50s inspired looks already, but I think McGonagall, if she even bothered with makeup, would have been a little outdated with her look, though it would still be classic. So I chose to go with the 40s, using this site as inspiration.

The 40s had a very clean look, with natural, groomed brows, a clean face, and minimal eye makeup. The focus was entirely on the lips. The 40s were all about lipstick, especially red lips. I'm of the impression that McGonagall probably didn't care too much for lipstick, but hey, a girl can dream!


I don't have a close-up for you all today, unfortunately, but that's because the eye makeup is very, very minimal. I used all matte eyeshadows--a skin-toned shade all over the lid, and a slightly deeper shade in the outer corner and crease just for a bit of definition. I tightlined my lashes with a black eyeliner and lined my upper lid with a brown pencil liner, and then I curled my lashes and put on a few coats of mascara.

Put on some foundation or anything with light to medium coverage and conceal what needs to be concealed. Use a pink-y blush on the cheeks and bring the colour up along the cheekbones. Contouring is totally optional, but I always think it adds something nice to the overall look, especially since I'm so used to having a super round face. (Which is changing seeing as I've lost over 20 pounds since August...)

THE LIPS! Okay, so all I did was put on some red lipstick and blot it a few times with a tissue to take off the shine and some of the colour. Even though the 40s were all about strong red shades, I think McGonagall wouldn't have wanted something that was too dramatic. I've also read that women were changing their lip shape with their lipstick to make their mouths appear fuller, but I always feel a little clownish doing it. But if you're comfortable with it, then go for it. Never let anyone else dictate how you do your makeup! Makeup should make you feel good about yourself, so don't listen to haters.

Also, maybe one day I'll dress up for pictures, but today is not that day. And it will likely not be that day until I can overhaul my closet for clothing that both physically fits me and matches my personal style. We'll see!

BROWS
Benefit Instant Brow Pencil in Deep
Anastasia Beverly Hills Tinted Brow Gel in Granite

EYES
theBalm Put a Lid On It! eyeshadow primer
Lid - Urban Decay eyeshadow in Foxy (very light yellow/white matte)
Outer corner + crease - Urban Decay eyeshadow in Faint (warm, dusty brown matte)
Brow bone - Saucebox Cosmetics Creme de la Creme palette (lightest off-white shimmer shade)
Upper lash line - Sephora Nano Eyeliner in 05 Chocolate
Waterline - Urban Decay 24/7 Glide-On Eye Pencil in Zero (black)
Mascara - Maybelline Volum' Express the Mega Plush mascara in Blackest Black

FACE
Urban Decay Naked Skin liquid foundation in 1.0
Benefit boi-ing concealer in 01
Under eyes - It Cosmetics Bye Bye Under Eye concealer in Light
Contour (cheeks) - NYX Powder Blush in Taupe (matte taupe)
Contour (nose) - Urban Decay eyeshadow in Naked2 (taupe matte)
bareMinerals blush in t.t.y.l. (sheer poppy pink)

LIPS
Maybelline Color Sensational lipstick in 645 Red Revival

21 November 2013

looks of the day - quick looks for concerts!

Today was another cloudy/rainy day so unfortunately I haven't been able to get any clear photos in natural light. But I felt like doing this simple look anyway! This was also requested by my friend Meg, who is going to a Frank Turner concert soon.

This look is a lot simpler than it might look because you don't want to be fussing for hours over your makeup to go see a concert only to have it melt down your face. I have to confess that I haven't honestly been to many concerts that weren't orchestral in nature. (I'm weird, I know.) I've only ever been to a youtube performers concert to see Starkid, and a handful of Company of Thieves concerts. We performed spontaneously at one of them and were asked to perform with them at another, so that was one of the best experiences of my life.

With minimal concert-going experience, I know that venues can get crowded and it's not always the sort of place you want to wear a full face of makeup to. A red lip and a smoky eye are simple ways to make your makeup stand out and look edgy without requiring a lot of work. I did two variations of this look: one where the lip is the focus, and one where the eyes are.

I won't be doing a full tutorial written out for the two looks, but I will say how I achieved the looks. The face products stayed the same between the two looks and were as follows:

FACE
Benefit boi-ing concealer in 01
Benefit Fake-Up Concealer in 01 Light
Under eyes - PIXI Beauty Correction Concentrate + Benefit Fake-Up Concealer in 01 Light

You don't need any foundation, and if you can get away with no concealer, I'd suggest it. If you need coverage all over your face, tinted moisturiser is your best option. Since we're going with a red lip, you want to neutralise any redness on the face or the lips will make you seem ruddy. I have rosacea, so a concealer was absolutely required to cover up the red patches on my cheeks.

LOOK ONE


The picture doesn't do the lipstick justice! This was a very simple look, even if it doesn't look like it--red lipstick makes everything look glamourous. I lightly filled in my brows with a brow pencil before taking a charcoal gray eyeshadow and patting it over my lids. There isn't a need to bring the colour up past the crease of the eyelid! I also used a taupe/grey eyeliner on my upper lash line and the outer third of my lower lash line, but that isn't necessary, either.

You don't have to stick to grey, either! I would advise against going any darker, but you can try any neutral shade--gold would be really gorgeous. Stay away from bright colours or jewel tones, though, or it'll compete too much with your lips.

The main focus of this variation is the lips. I used a matte balm pencil and just applied the colour all over my lips. If you want something that lasts longer (especially if you'll be eating and/or drinking, though I still wouldn't advise wearing lip colour through a meal since oils will break down the pigment) you could try lining and filling the lips with a lip pencil and topping it with a lipstick, blotting with a single ply of tissue, patting some translucent powder on, and then applying another layer of lipstick. OR try something like Stila's liquid lipstick, which applies like a lip gloss but dries down to a matte finish and stays put.

BROWS
Benefit Instant Brow Pencil in Deep

EYES
Lid - bareMinerals loose eyeshadow in k.i.t. (matte medium charcoal gray)
Liner - Urban Decay 24/7 Glide-On Eye Pencil in Desperation (deep taupe to gray matte)

LIPS
Revlon Colorburst Matte Balm in 250 Standout
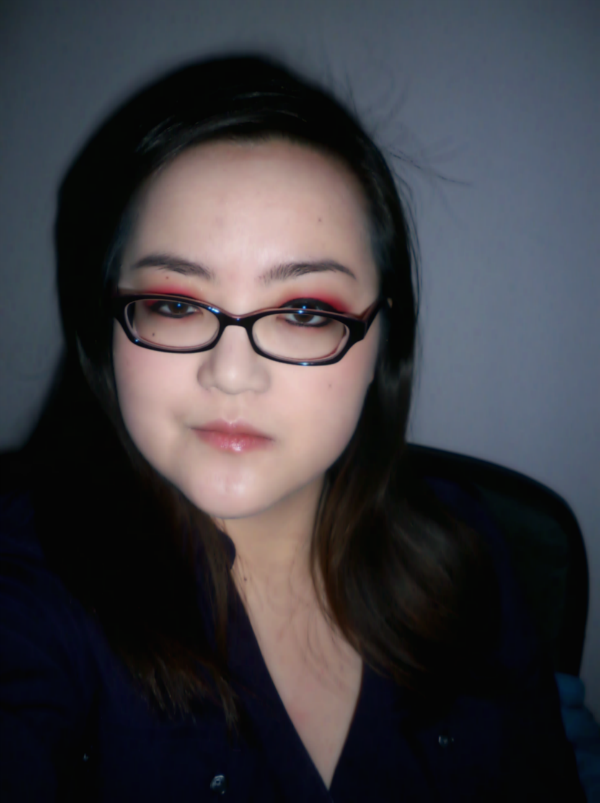


LOOK TWO


This look was more focused on the smoky eye. At a concert, you don't want to worry about your eye makeup melting down your face or getting smudged, and a smoky eye is the perfect solution! The more it smudges, the more rock-and-roll you look, so you don't even need to check yourself in a mirror every few hours.

To get this look, all I did was take a black eye pencil and draw a thick line above my lashes. No need to be precise--you're going to smudge this out with a cotton swab so it doesn't need to be perfect. After smudging, take that gray eyeshadow and apply it on your lid up past the crease, as well as along the lower lash line. This is a simple smoky eye that only gets better as the night goes on and if it creases or smudges, just take a finger and run it over your lid and move on! I did put on a coat of mascara, which helps to emphasise the smoky feel.

Don't be afraid to try another colour, either! Since you're playing up the eyes, you can do a smoky eye with any colour you'd like. Emerald or eggplant would look amazing, or bronze or navy. Really, anything goes!

Since the look is heavy on the eyes, you want to balance it out by filling in your brows. I had the pencil on from the first look, but I put some powder over them to give them more definition and topped them off with a tinted brow gel.

Apply a tinted balm to the lips. I apparently don't have anything that is red but sheer, so I had to improvise by mixing a balm pencil with some rose salve. You can apply the same balm to the cheeks for a little colour and shine, but if you're going to be moving around or in a large crowd, you'll get a natural flush so you can skip that step.

BROWS
Benefit Instant Brow Pencil in Deep
Anastasia Beverly Hills Beauty Express brow kit in Brunette
Anastasia Beverly Hills Tinted Brow Gel in Granite

EYES
Lid - bareMinerals loose eyeshadow in k.i.t. (matte medium charcoal grey)
Liner - Urban Decay 24/7 Glide-On Eye Pencil in Perversion (deepest matte black)
Lashes - Maybelline Volum' Express the Mega Plush mascara in Blackest Black

LIPS
Clinique Chubby Stick Intense Lip Colour Balm in Mightiest Maraschino + C.O. Bigelow Rose Salve


20 November 2013

j.r.r. tolkien's the hobbit series #1 - hobbits

Today's weather took a complete 180 degrees because it was sunny earlier today and then just a few minutes ago, it was raining and even hailing a little bit. Weird!

This look was requested by my friend Meg, who asked for something inspired by The Hobbit since the second movie is coming out soon. I have to confess that I didn't watch the Lord of the Rings movies until two years ago at the constant pestering of my friend Erica and after I did, I have to say that I LOVE them. I have every intention of going to see the second Hobbit film--after all, I went to see the first and thought it was brilliant.

When I think of J.R.R. Tolkien's world, I always come up with primarily gold, brown, and green hues, especially in relation to the hobbits. Those were the colours I focused on here.


This turned out to be a bit of a smokey look that relied on golds near the inner corner and green at the outer corner with a deep bronze to transition between the two, and I quite like how it turned out! It's meant to be a slightly softer look, so I went for a brown liner instead of black, though I did use a bit of black to tightline the lashes. It's not a challenging look to accomplish, though I did spend more time on it than I expected--there's a reason why I didn't end up getting any good close-ups! You don't need to apply your eyeshadow in any particular shape, but just keep the outer corner from dipping down.

Because this look was so focused on the eyes, I just applied a gloss to my lips. The next picture, I used a nude lipstick and I think I like that combination a little better.


  1. Apply foundation/tinted moisturiser/BB cream as needed. I used a BB cream here because it's a little lower maintenance but anything goes.
  2. Apply an eyeshadow primer so everything stays put and wait one minute before applying eyeshadow. Before I put any colour on, I put a dusting of loose powder on my lids so it would be easier to blend the colours, but that's also optional.
  3. Starting at the inner corner, take a gold eyeshadow and pat it onto the lid, bringing it about a third of the way onto the lid. You want this to pop! I tend to use my finger to pack on colour because I find that the brushes I reach for tend to sheer out the pigment too much.
  4. Take a green-olive eyeshadow and pack on the colour at the outer corner of the lid, bringing it a third of the way toward the center of the lid.
  5. Using a brush, take a bronze/medium brown eyeshadow to blend the gold and green shadows together.
  6. THIS STEP IS COMPLETELY OPTIONAL! I used a dark blue-green eyeshadow and placed a light layer of it into the crease of my eyelid.
  7. Line your upper lid with a brown eyeliner. You can also tightline your lashes with a black liner here and line your waterline with a white liner, but it's not necessary. (Especially if you're going to wear this to the movie theatre to see The Hobbit: Desolation of Smaug. You might risk eyeliner running down your face from tears! Don't be ashamed--I've cried in most of the movies I've seen in theatres over the past two years.)
  8. Apply two coats of mascara. The first coat I applied was a non-waterproof mascara, and the second was a waterproof mascara. This way, you get the stay-put benefits of the waterproof mascara but it's easier to remove at the end of the day.
  9. Using a thin brush, take some of the green eyeshadow and trace below your lower lash line.
  10. Clean up any loose eyeshadow! Apply concealer around your eyes and wherever else you need it.
  11. Pat a bit of peach-pink blush onto the apples of the cheek.
  12. Apply a coat of lip gloss to the lips and you're all set.


BROWS
Anastasia Beverly Hills Beauty Express brow kit in Brunette
Anastasia Beverly Hills Tinted Brow Gel in Granite

EYES
theBalm Put a Lid On It eyeshadow primer
bareMinerals mineral veil
Inner corner - Urban Decay eyeshadow in Sin (champagne shimmer)
Inner lid - Urban Decay eyeshadow in Half Baked (golden bronze)
Center of lid - Urban Decay eyeshadow in Smog (deep coppery bronze)
Outer corner and lower lash line - Urban Decay eyeshadow in Mildew (mossy green shimmer with gold shift)
Crease - Shiro Cosmetics loose eyeshadow in Lingered in Twilight (blackened blue-green with slightly metallic shimmer)
Upper lid liner - Hello Kitty Charmmy eye pencil in Chocolate Milk (shimmery brown) + Fyrinnae loose eyeshadow in Arcane Magic: Evocation (neutral taupe with pale rose/coral and mint green reflect)
Upper lash line - Urban Decay 24/7 Glide-On Eye Pencil in Perversion (deepest matte black)
Lower waterline - Urban Decay 24/7 Glide-On Eye Pencil in Yeyo (metallic white)
Lashes - Maybelline Volum' Express the Mega Plush mascara in Blackest Black + Maybelline Volum’ Express The Rocket waterproof mascara in Blackest Black

FACE
Embryolisse Lait-Crème Concentrè
Dr. Jart+ V7 Beauty Balm
Under eyes - PIXI Beauty Correction Concentrate + Benefit Fake-Up Concealer in 01 Light
Benefit boi-ing concealer in 01
L'Oréal Paris Magic Smooth Soufflé Blush in Celestial (muted rosy pink)

LIPS
Smashbox O-Gloss Gold

19 October 2013

looks of the day - two looks inspired by lisa eldridge's videos!

So, after posting the last look inspired by one of Lisa Eldridge's looks, I saw her post about how she loved all of the photos that were being tagged #mylisalook and she set up a bit of a contest. (Look, my face is on her post!) It's been a few days but I just wasn't feeling like putting on makeup, especially with the cloudy weather over the past few days. But today, she posted a new video and I really wanted to try it! There's also a red eyeshadow video here that I just had to try because I'm all about the bright colours.


This look is very subtle but gorgeous for daily wear. I've been looking for every excuse to use the rms beauty lip2cheek in diabolique because I'm absolutely obsessed with it, and luckily it can be applied very sheerly for a nice berry tint to the lips. (Also, look at how I took this photo--I'm apparently in denial about my height despite the fact that I've been 5'3" for almost 8 years of my life...)

BROWS
Benefit Instant Brow Pencil in Deep
Anastasia Beverly Hills Tinted Brow Gel in Granite

EYES
Lid - Urban Decay eyeshadow in Half Baked (golden bronze)
Inner corner - thebalm eyeshadow in Snobby (yellow with gold shimmer)
Lash lines - Urban Decay 24/7 Glide-On Eye Pencil in Zero (black)
Lashes - Maybelline Volum' Express the Mega Plush mascara in Blackest Black

FACE
Embryolisse Lait-Crème Concentrè + Dr. Jart+ V7 Beauty Balm
Under eyes- Maybelline Fit Me concealer in 15 Fair
Benefit Fake Up concealer in 01 light
COVER FX Cream Concealer in N Extra Light
Contour - Maybelline Fit Me stick foundation in 235
Highlight - Benefit high beam
bareMinerals blush in t.t.y.l. (sheer poppy pink)

LIPS
rms beauty lip2cheek in diabolique (dark burgundy)

Since this was subtle, I was able to take it off with relative ease and put on the next look. Red eyeshadow is possibly one of my favourite things in the world but wearing it on a normal basis tends to earn you strange looks. Believe me, I've worn it a few times to class and people don't know what to say most of the time.


My glasses just make my eyes look even more misshapen. I've come to realise that I actually like a strong eye with a strong lip on me. I tend to think that with a nude lip, I actually look quite washed out because I'm so pale. So here's the look with some pink-red lips!

BROWS
Anastasia Beverly Hills Tinted Brow Gel in Granite

EYES
Sugarpill pressed eyeshadow in @#$%! (vampy pearl red with silver metallic sheen)
Liner - Urban Decay 24/7 Glide-On Eye Pencil in Perversion (matte blackest black), Maybelline Line Stiletto Ultimate Precision Liquid Eyeliner in Blackest Black
Lashes - Maybelline Volum' Express the Mega Plush mascara in Blackest Black

FACE
Urban Decay Naked Skin liquid foundation in 1.0
Benefit Fake Up concealer in 01 Light
NYX powder blush in Desert Rose (matte burgundy-pink)

LIPS
fresh Sugar Lip Treatment SPF 15
Sephora Rouge Cream Lipstick in The Red 04 (classic bright red)


I was going to do a third look, probably something for Halloween, but my eyeliner and my makeup remover wipe got into a catastrophic fight and I almost lost my eyeballs because of it. The skin around my eyes? Already a casualty. There was a great burning sensation as I was trying to take off all the black liner so I decided it was best to not do anything else!

13 October 2013

look of the day - more tumblr inspiration a day late!

Hi everyone! So this look was actually done yesterday, but I didn't get a chance until today to write up a post.

There are always so many beautiful pictures on Tumblr from which to draw inspiration and I saw this one and knew I had to try it.


The eyebrow was the most challenging part. I have a naturally high arch in my brow, but it's not noticeable when I don't fill in my brows because my brows are short. This made the whole covering the brow issue a lot harder so you'll see that my brow is much thicker than the one in the picture.


I also considered using more black eyeliner on the upper lid to finish up the look, but I usually remove my makeup right after taking photos because as much as I love dramatic makeup, sometimes walking around the house in it is something I don't want to do. I had a battle to the death with makeup remover, coconut oil, cotton swabs, and cotton pads against Urban Decay's Perversion eyeliner the day before, and I decided I wanted to go easy on my skin whilst doing this, so all I did was a quick swipe of the waterline.

Because this was quick and I only did it on one eye, no full face photo for this one, unfortunately! I used the brow erasing technique featured on Beautylish, which you can find here.

BROWS
Elmer's Washable Glue Stick
bareMinerals mineral veil
Sephora Nano Eyeliner in 01 Midnight Black + 03 Pure White

EYES
Lid - Sugarpill pressed eyeshadow in Tako (matte white)
Liner - Makeup Geek Gel Liner in Poison (matte rusty red) + Sugarpill Chromalust pigment in Asylum (red shimmer)
Upper lash line - Urban Decay 24/7 Glide-On Eye Pencil in Perversion (matte blackest black)
Lower lash line - Urban Decay 24/7 Glide-On Eyeliner in Yeyo (metallic white)
Lashes - Maybelline Volum' Express the Mega Plush mascara in Blackest Black

Finally, I wanted to give a shout-out to the lovely Laura, who interviewed me for her Girls Fighting Evil blog. Check out the post here!

06 October 2013

halloween looks - do, a deer, a female deer

The weekend is high time to experiment with Halloween makeup, and I found some inspiration whilst Googling around. Sometimes painting your face to resemble an animal is really entertaining and it's a great potential costume. All you need to add is some brown clothing if you don't want to go all out.


 Interestingly enough, I'm wearing a shirt with a stag on it. It's actually a Harry Potter shirt with Harry with his patronus in red on the front, and Voldemort with his snake patronus in green on the back. You may also notice that my hair looks different here--hello, massive forehead!--I always wear a headband to keep my hair back whilst doing makeup that requires more than a quick fill of the brow and some lip balm. My bangs happen to fall directly in front of my forehead and have started to cover my right eye.


This is a rare post where you'll get a photo I originally posted on Tumblr. I quite like this picture, actually! I didn't take any pictures with my awful camera where I was wearing my glasses because I wanted the makeup to be the focal point, but usually I take Tumblr pictures with my glasses because I'm basically blind.

I actually wrote up a step-by-step instruction guide to getting this look. Obviously this would have been better if I had pictures of each step, but I'm really hasty with my makeup application sometimes and I have no idea how to take photos of myself whilst I'm putting makeup on. It's something I'm trying to teach myself!


  1. Apply concealer to cover dark circles and redness. I forgot to cover my dark circles (whoops!) but I have very large red patches on my cheeks that I covered.
  2. Put on eyeshadow primer so the eyeshadow stays in place.
  3. Use a white pencil to colour the area around the eyes and blend. You can use a brush, but I just used my finger because I have more control over where I spread the product. Place a layer of matte white eyeshadow over this area. I used my NYX Milk pencil and Sugarpill eyeshadow in Tako.
  4. Apply matte brown eyeshadow on the lid. I used my finger to do this, but if you have better brushes/aren't as finnicky, go ahead and use a brush. The shadow I used was Urban Decay's Buck and I blended it out with UD's Naked, but you don't have to use a second shade to blend it out if you're using a brush--my fingers just skipped a little so I needed a little give.
  5. Line your waterline and lower lashline with a white pencil, and add a line under your lashes. I used UD's Yeyo liner.
  6. Line your upper lashline with a black pencil. You want to extend the eyeliner into your inner corner and downward, and to the outer edge of your eye. When you reach the outer edge, you want to make a straight line from the eyeliner that angles upward.
  7. Line under the white liner with the black liner. You want to make your eyes look bigger, so don't line the entire lower lashline. Also, bring the line that you extended past the inner corner back toward your lash line so it forms a point.
  8. Using bronzer or a matte brown eyeshadow/blush, begin to contour your face. Focus on the hollows of your cheeks and bring that up to just under where your white circles were drawn. Aim for a soft triangle that points downward.
  9. Bring bronzer up toward your temples and around your hairline. Put a little bronzer around your jawline, as well.
  10. Fill in your eyebrows. My usual brow shape is too arched for this softer look, so I used an old eyeliner and made my brows a little straighter and fuller. (You can probably add mascara somewhere around this point, but it's not necessary.)
  11. Brush bronzer down the sides of your nose. Use a white pencil to highlight just between your brows and down the bridge of your nose to contour it.
  12. Using a brown pencil, sketch a line that connects the inner end of your eyebrow to the tip of your nose, making sure that you draw a straight line. Blend this out with your finger and repeat on the other side.
  13. Use a brown matte shadow to blend out the line where it's closest to your eyebrow. This way it makes the line look a little more natural.
  14. Take a black pencil and start to colour in the base of your nose. Aim to have two peaks that reach toward the brown lines you drew earlier, and then slope those points down toward the edges of your nostrils.
  15. Draw a line connecting the base of your nose to the cupid's bow of your upper lip with the black pencil. You can also colour in your upper lip with this pencil, but be careful--some eyeliners are not meant to be used near the mouth. I only had this on for a few minutes, but better to err on the side of caution and either use a black lipstick or something clearly marked lip-safe.
  16. Use either a nude lipstick on the bottom lip or concealer. I used both, but only because the nude lipstick I was using was actually too dark, so I lightened it with concealer.
  17. Use a white pencil to draw white spots on your cheeks over the bronzer. You can add additional spots closer to your hairline like I did or skip that entirely.


This sounds a lot more complicated than it actually is--the worst part is the eyeliner, and if you can't tell, that's what I managed to screw up big time in these photos! If anything, I'd advise practising the eyeliner ahead of time. The rest of it will fall right into place. Here's the full list of products.

BROWS
Sephora Nano Eyeliner in 08 Iced Brown

EYES
Entire eye area - NYX Jumbo Eye Pencil in Milk (white) and Sugarpill pressed eyeshadow in Tako (pure matte white)
Lid - Urban Decay eyeshadow in Buck (fawn brown matte) and Naked (nude matte) blended out to the crease
Upper lash line + inner corner + part of lower lash line - Urban Decay 24/7 Glide-On Eye Pencil in Perversion (matte blackest black)
Lower lash line - Urban Decay 24/7 Glide-On Eye Pencil in Yeyo (metallic white)

FACE
Embryolisse Lait-Creme Concentre
Benefit boi-ing concealer in 01
bareMinerals All-Over Face Color in Warmth (healthy/sun-kissed glow - chestnut)
Sephora Nano Eyeliner in 05 Chocolate, 01 Midnight Black, 03 Pure White

LIPS
Benefit boi-ing concealer in 01
NYX Matte lipstick in Butter (toffee nude)
Sephora Nano Eyeliner in 01 Midnight Black